 Learn how to make milk kefir cream cheese, yogurt, raita, sour cream, labneh, and cheese cake with just one ingredient - Milk Kefir! There are many benefits to making milk kefir at home. I have not purchased store-bought yogurt, sour cream, nor cream cheese since I started making this healthy-gut remedy. Furthermore, it has more probiotic strains; and its versatility means you can make a variety of products from just milk kefir! If you have over-cultured your milk kefir and it becomes too tart, or you just want to consume milk kefir in more than drinkable form, you can drain the whey from the milk kefir, and use it in various ways. It’s versatility is endless. You could eat it as a yogurt with fruits. You could use it as a savoury dip with herbs and spices. You can use it as a raita as well. How about as a healthy frosting for cakes? It is also delicious as a sauce. You can also press it further into a firm soft cheese and use it as a cream cheese or farmer’s cheese. I love making cheesecakes with it. This instructional video will show you how easy it is to make Milk Kefir Cream Cheese, Yogurt, Sour Cream, Labneh, etc. All you need is:
To buy milk kefir grains, click here: Buy Milk Kefir Grains 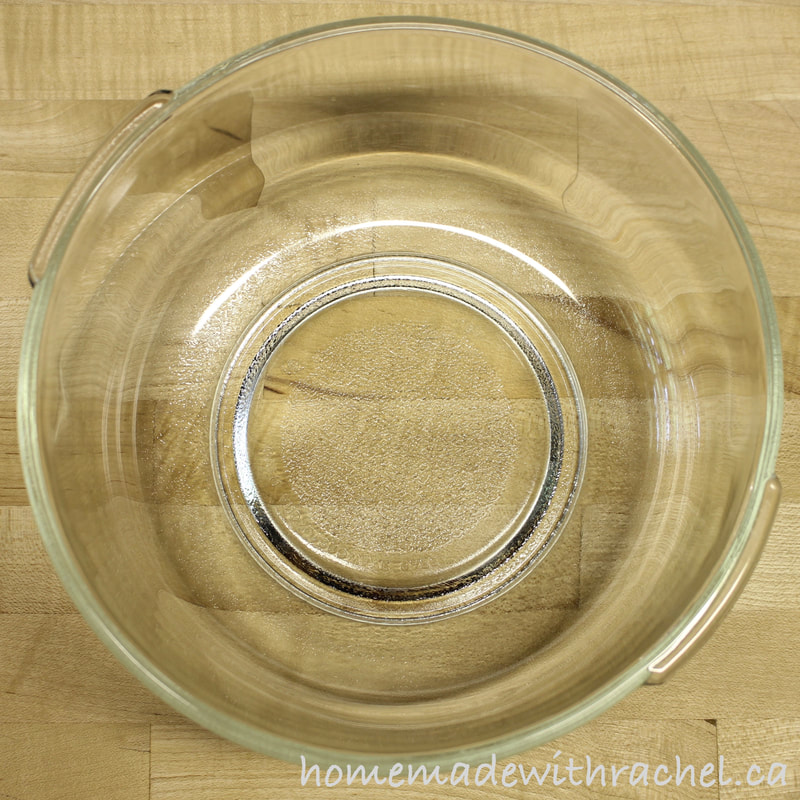 Non-corrosive and Unleaded Bowl 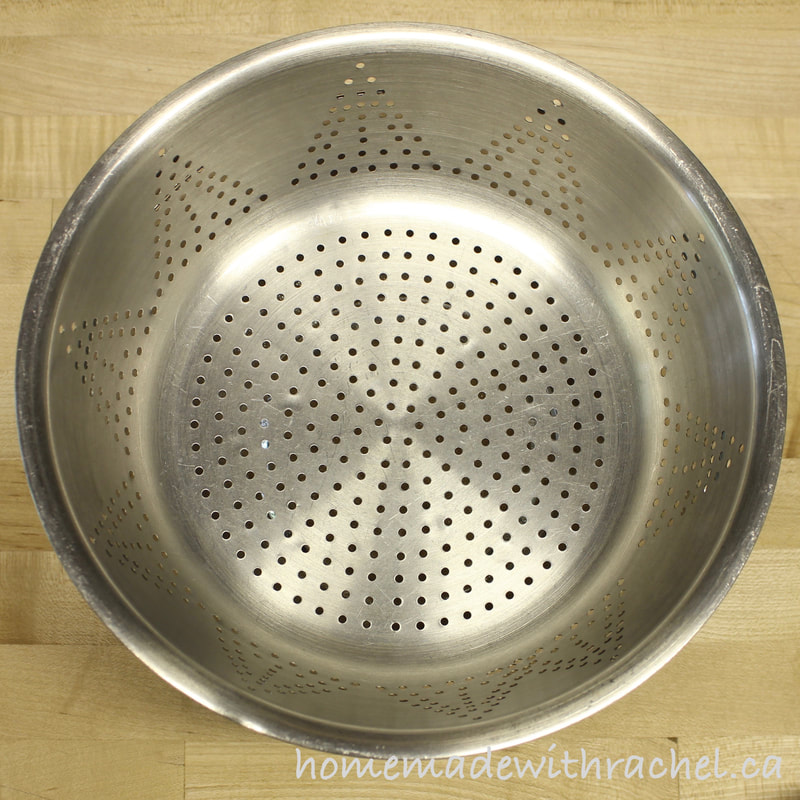 Non-corrosive Colander 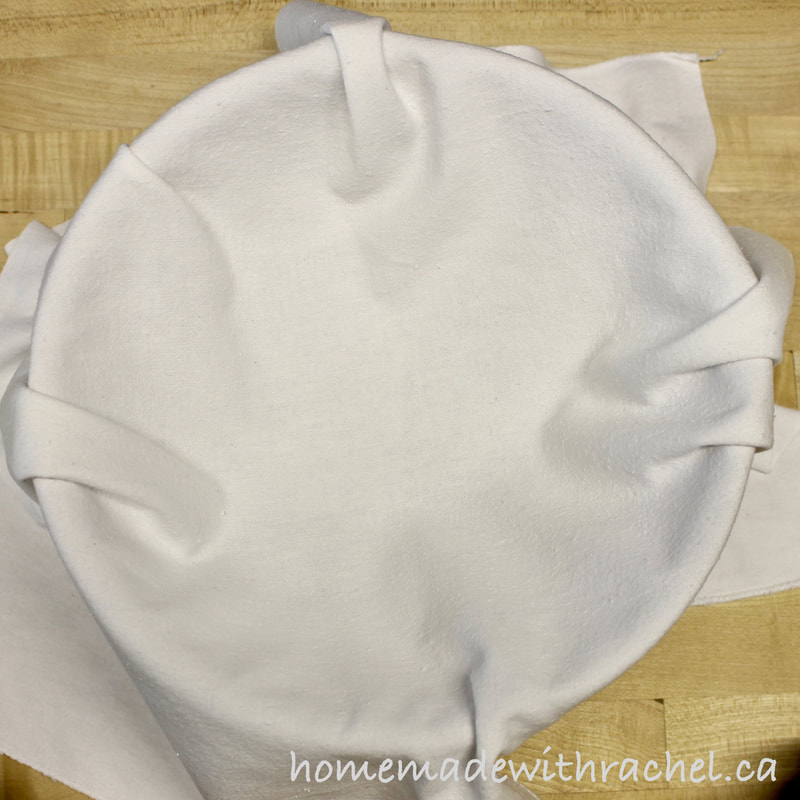 Cheesecloth 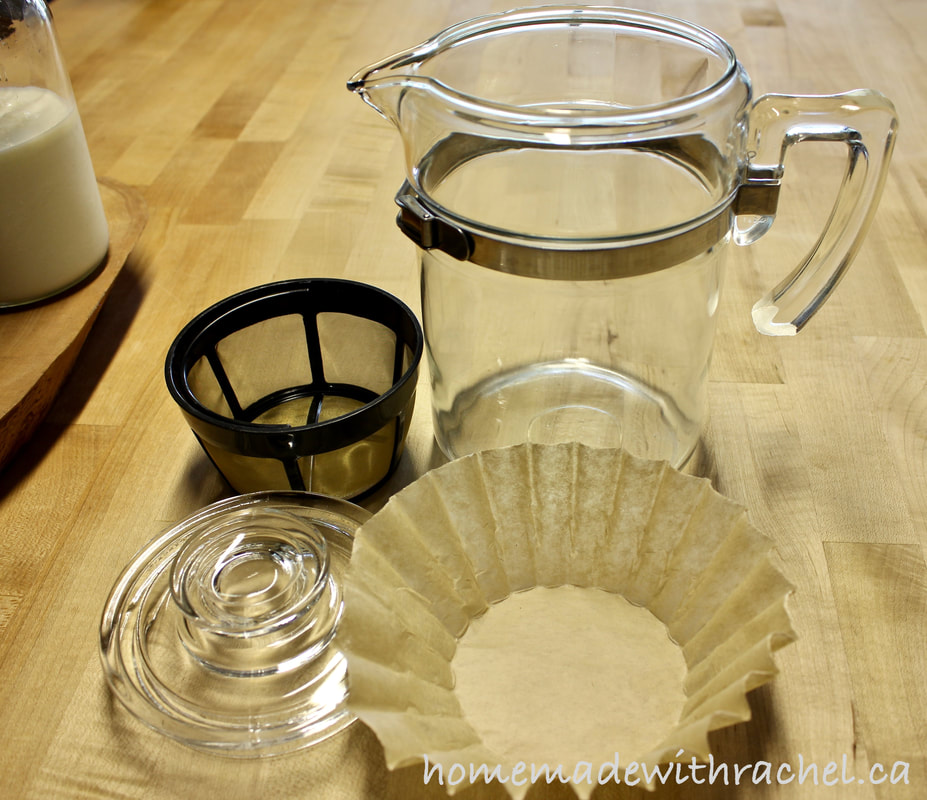 Alternatively, if you would like to make a small batch, you can use a coffee filter/strainer with a vessel large enough to suspense the filter to allow the whey to drip into. 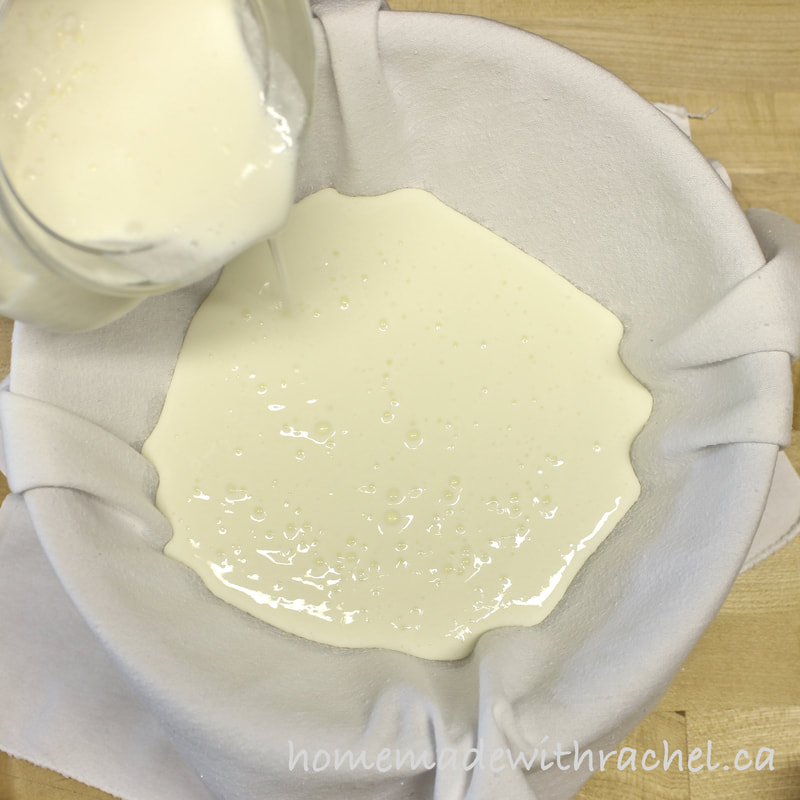 Instructions: Place colander in a bowl, making sure it is suspended and not too large that the bottom of the strainer touches the inside bottom of the bowl. You would need ample room inside the bowl to catch the whey. Line the colander with cheesecloth. Pour the milk kefir into the cheesecloth lined colander. 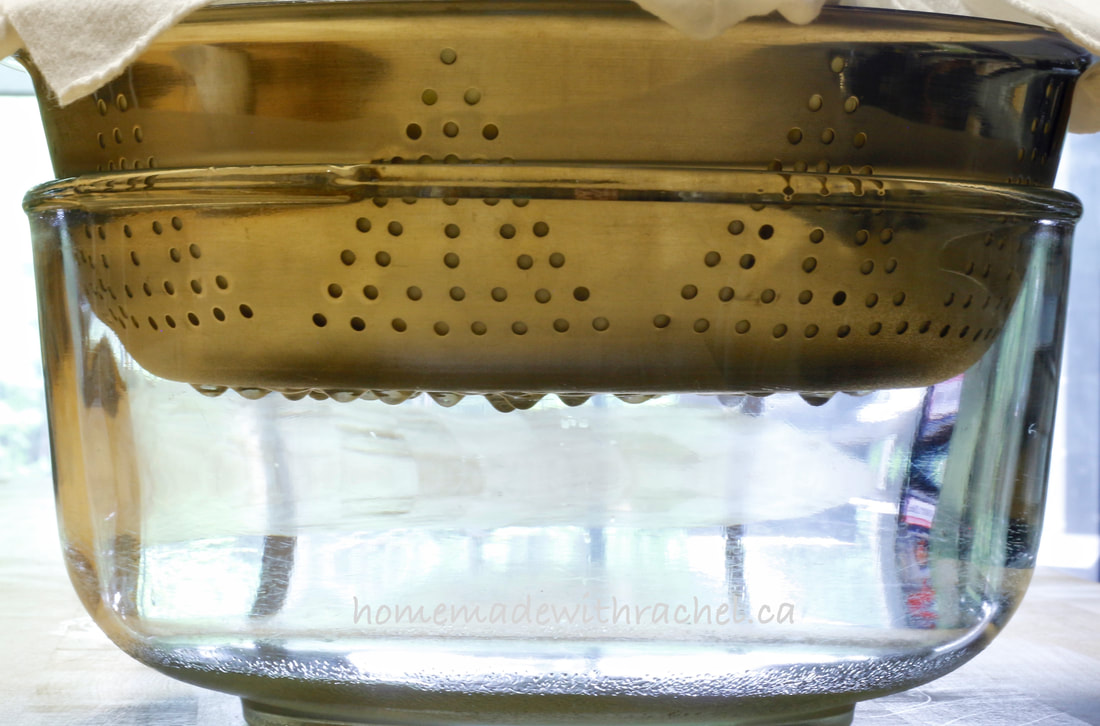 The Whey will start to drip from the bottom of the colander into the ball in a matter of minutes. 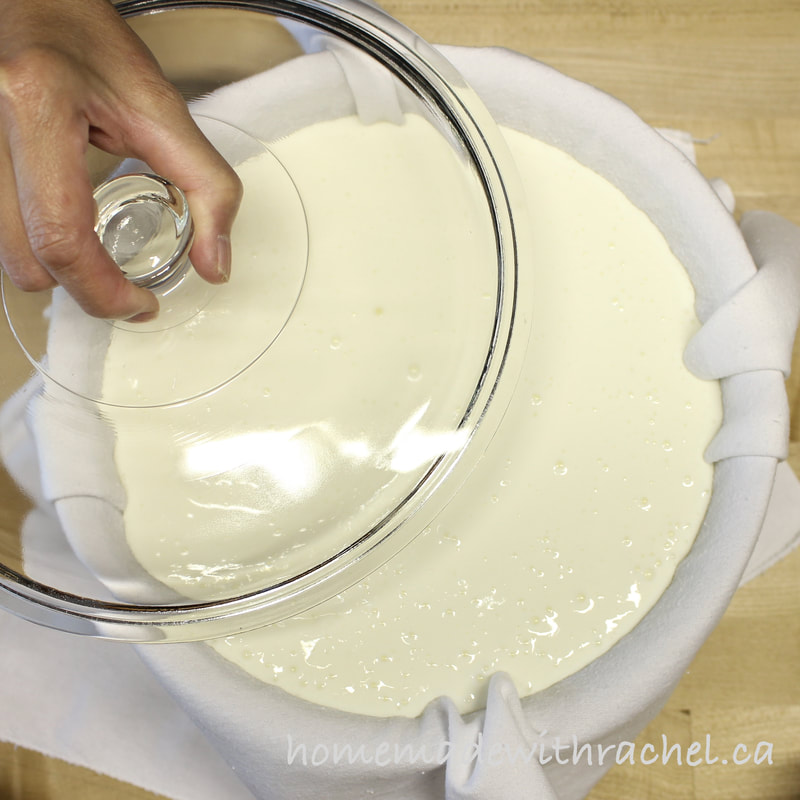 Cover with a non-corrosive lid. 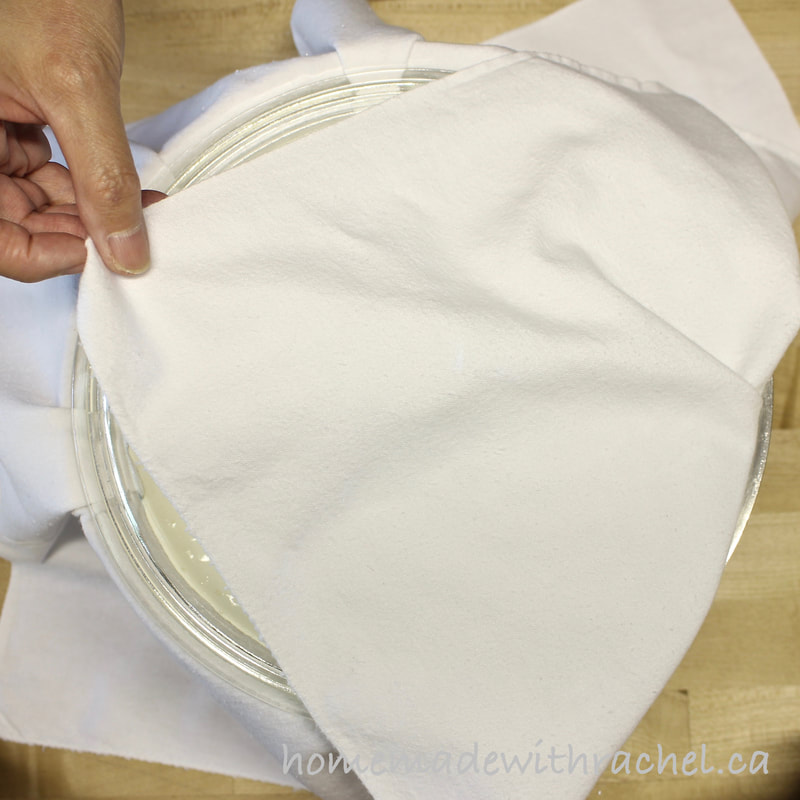 Fold the cheesecloth over the lid. The cloth will start to absorb the whey liquid and if left hanging down, will start to drip. Refrigerate overnight. 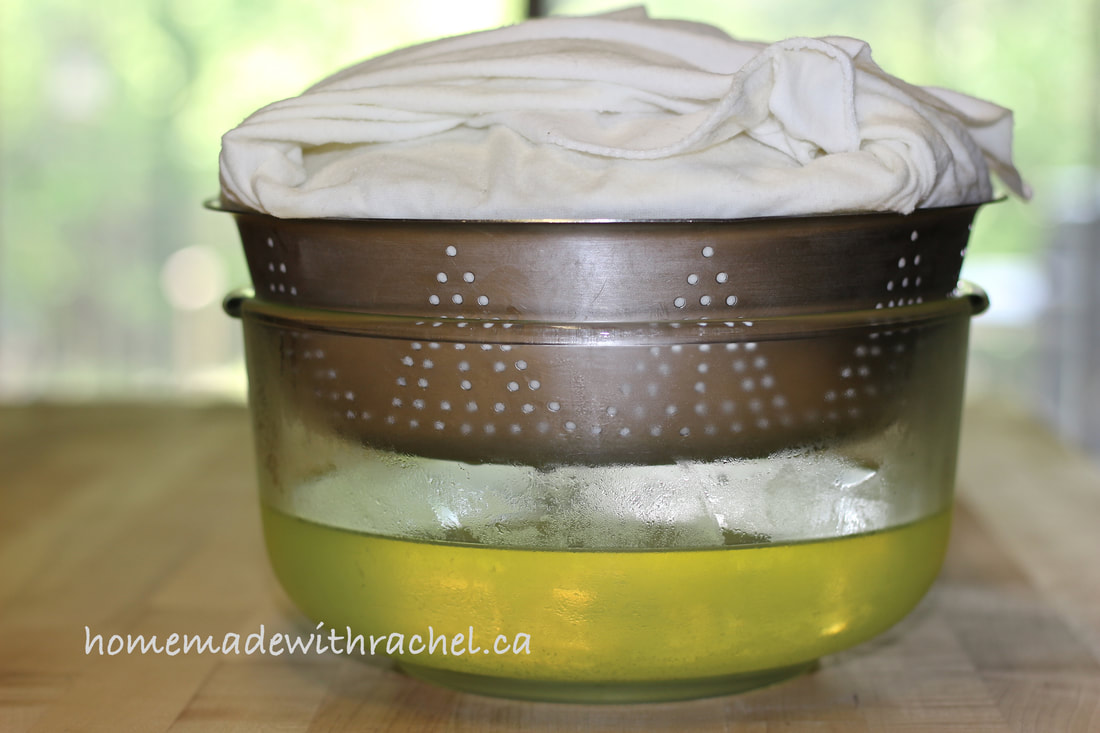 The next day, most of the whey would have separated into the bowl. 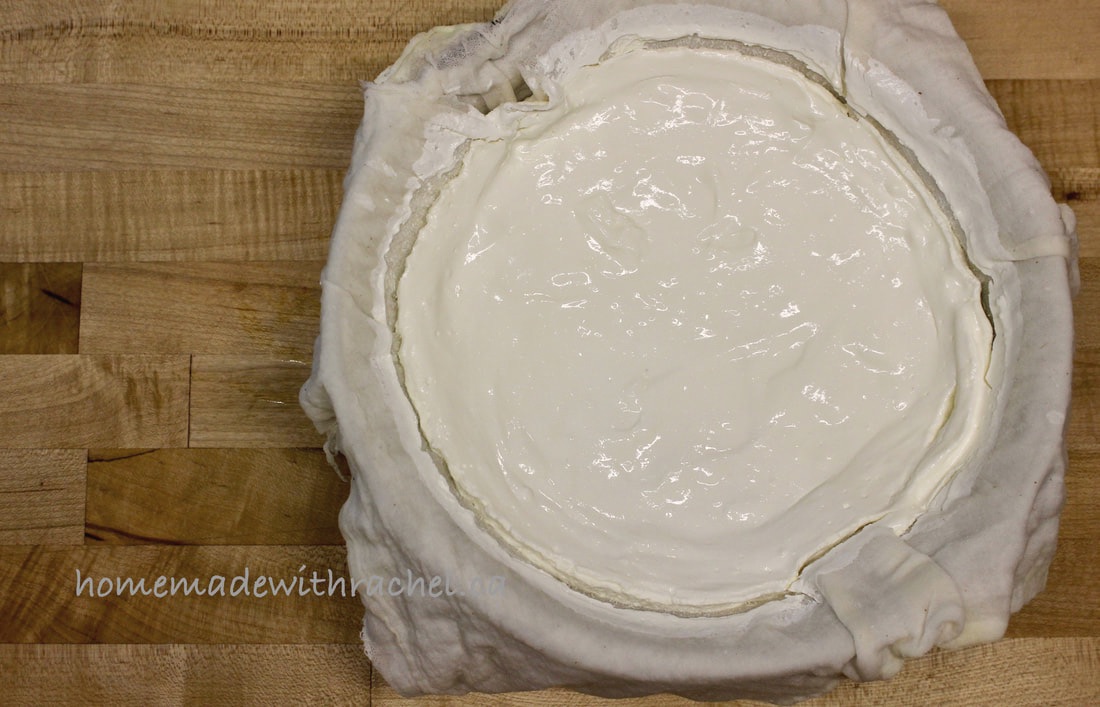 The milk kefir would have transformed into a thickened mass. You may stop the process now if you wish, and consume it much like yogurt or sour cream. 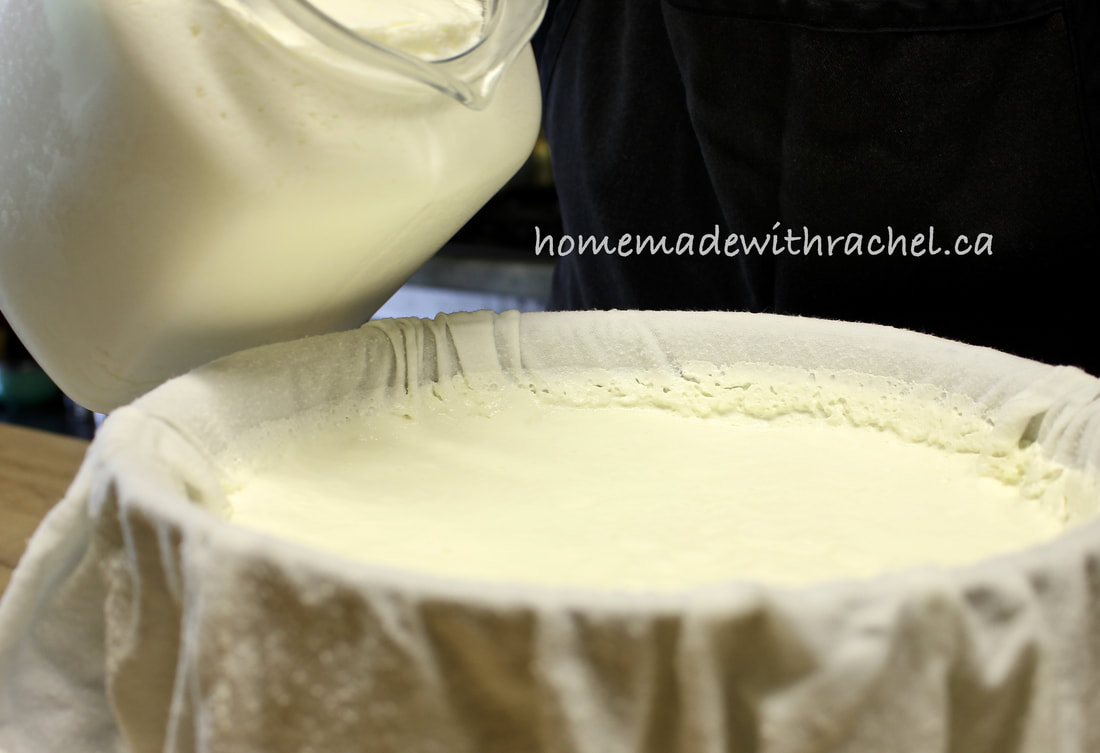 If you are only making a small amount of milk kefir at a time, you can simply keep adding milk kefir each day to the cheesecloth covered colander until you get the desired amount. 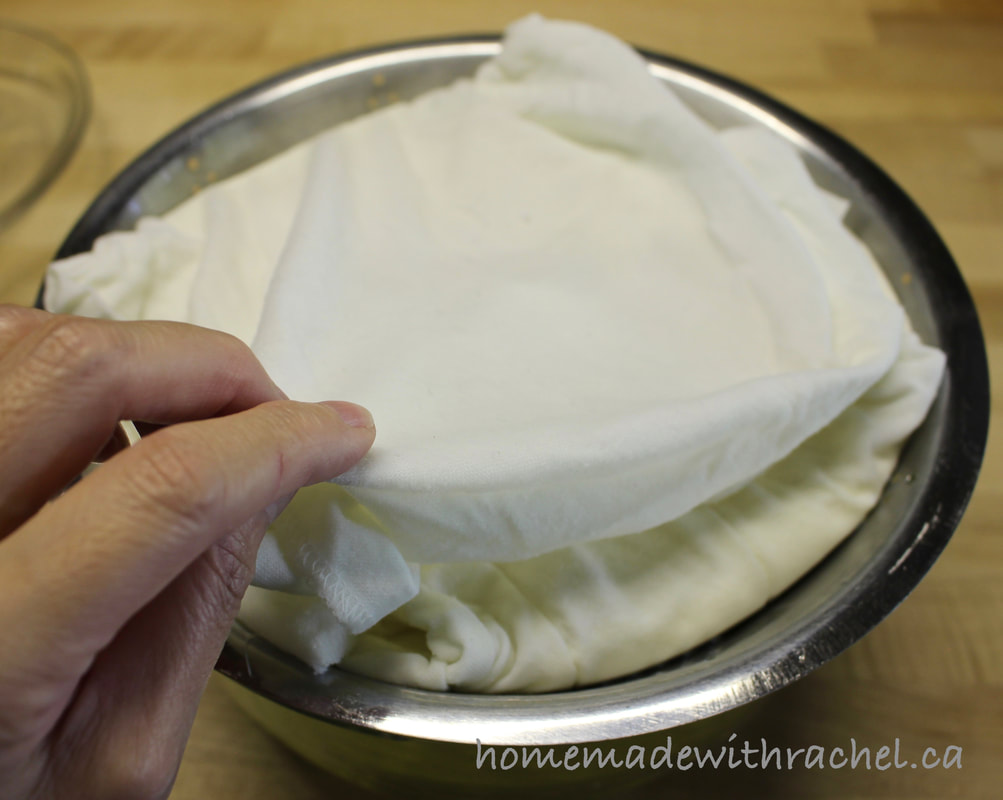 To make cream cheese, after it has strained to the consistency of yogurt or sour cream, fold the cheesecloth on top of the strained milk kefir. 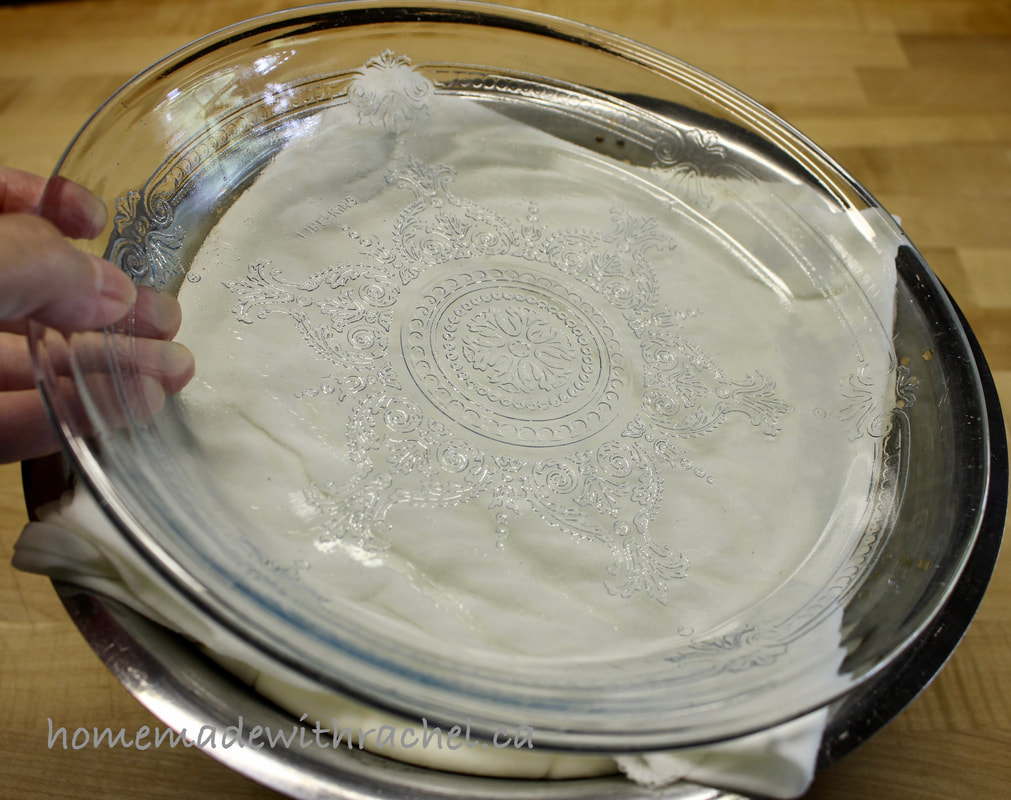 Place a non-corrosive plate or glass pie plate on top 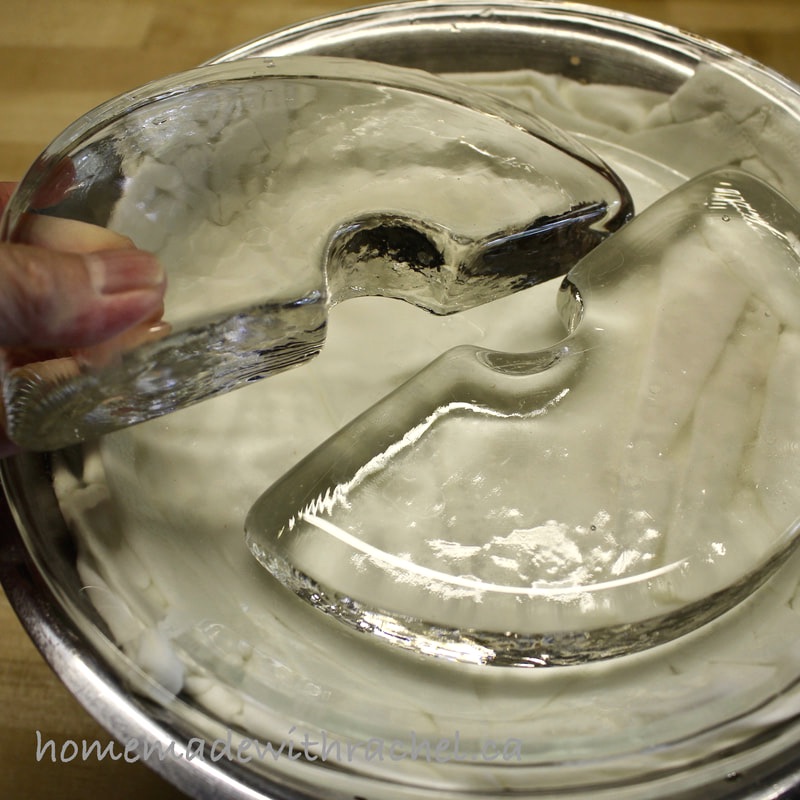 Top with some sort of weight such as a sealed glass jar of water, a large clean rock or fermenting weights. To make a thicker cream cheese, you may add extra weight in increments as needed. Be careful not to place too heavy a weight on top of it initially. Your goal is to gradually press as much whey from the milk solids to achieve your desired consistency. If the weight is too heavy, you will be forcing milk solids through with the whey which is not what you want to achieve. 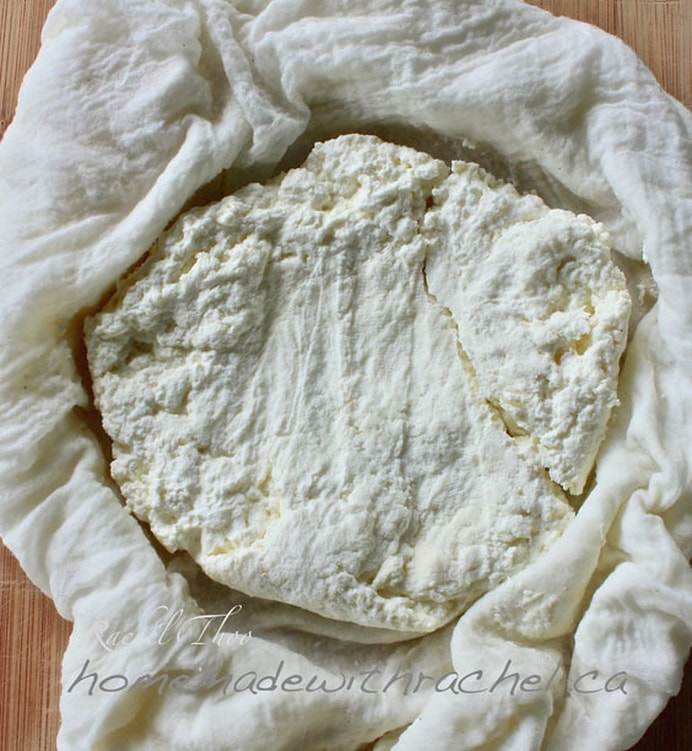 Your milk kefir cream cheese is now ready to make all sorts of delicious and healthy concoctions such as a sweet or savoury cheese spread, cream cheese, labneh, etc. The creativity is unlimited. 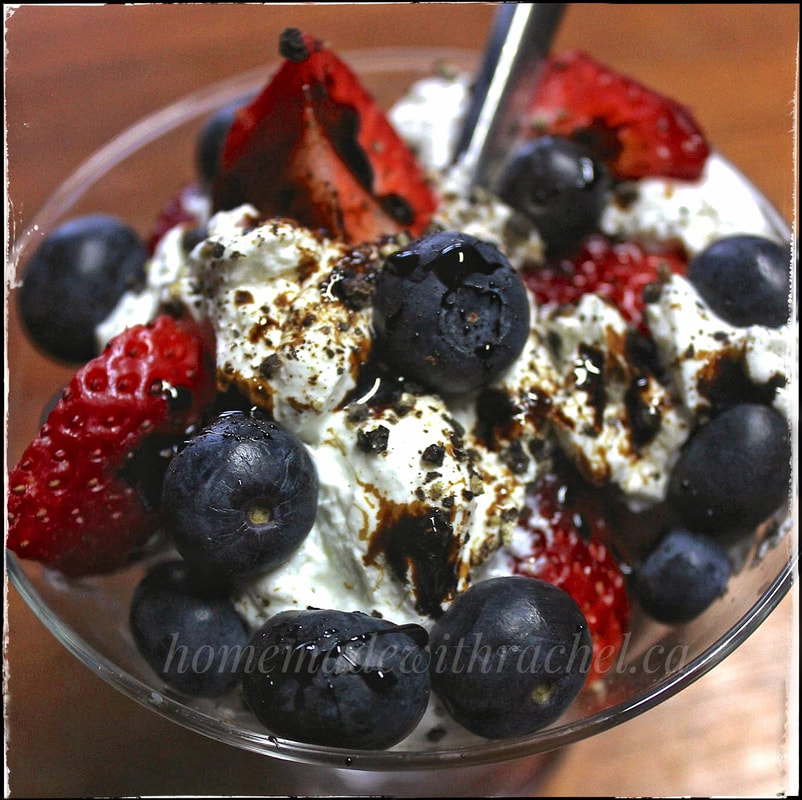 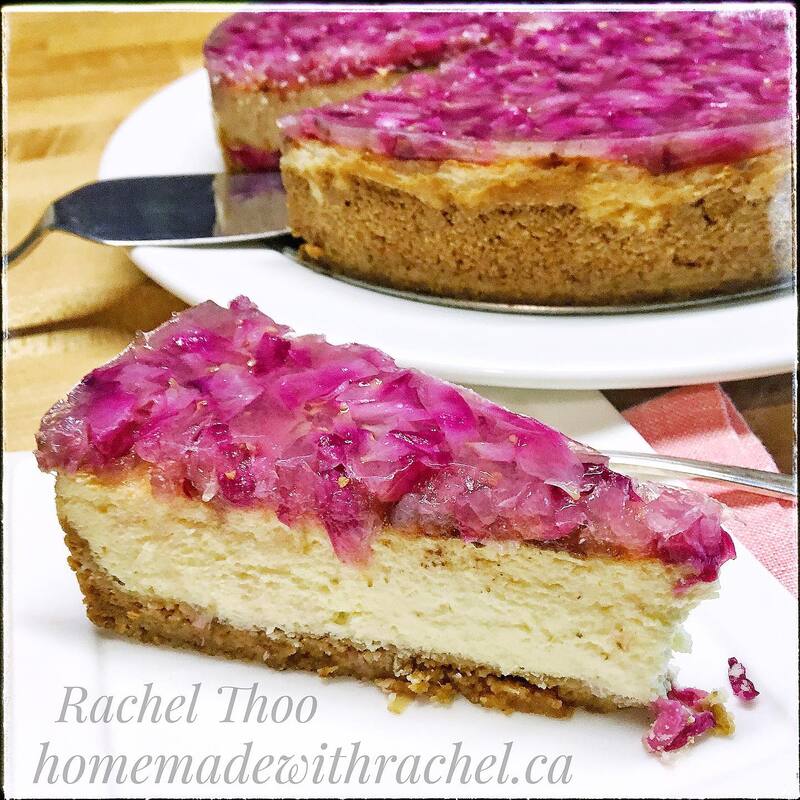   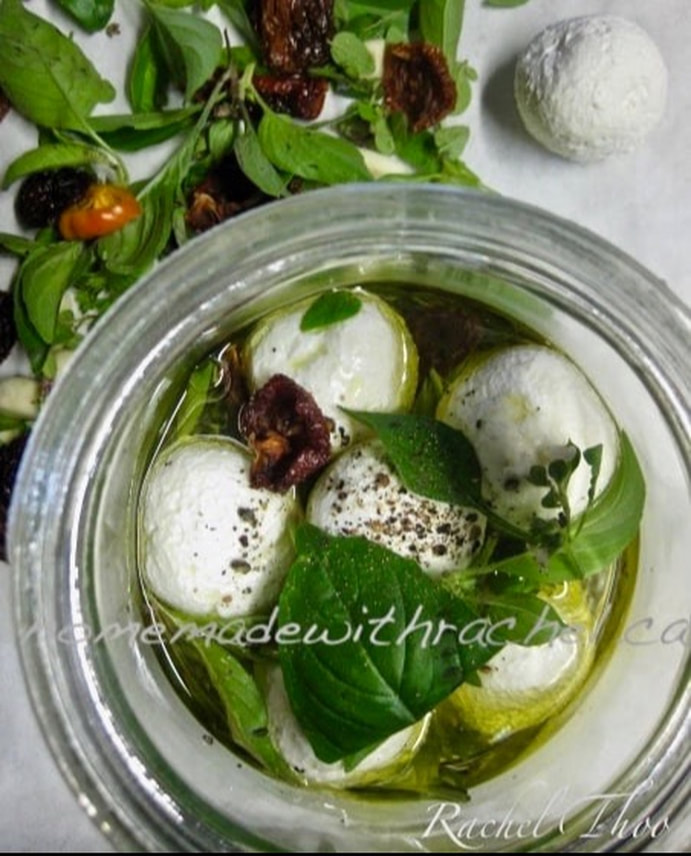 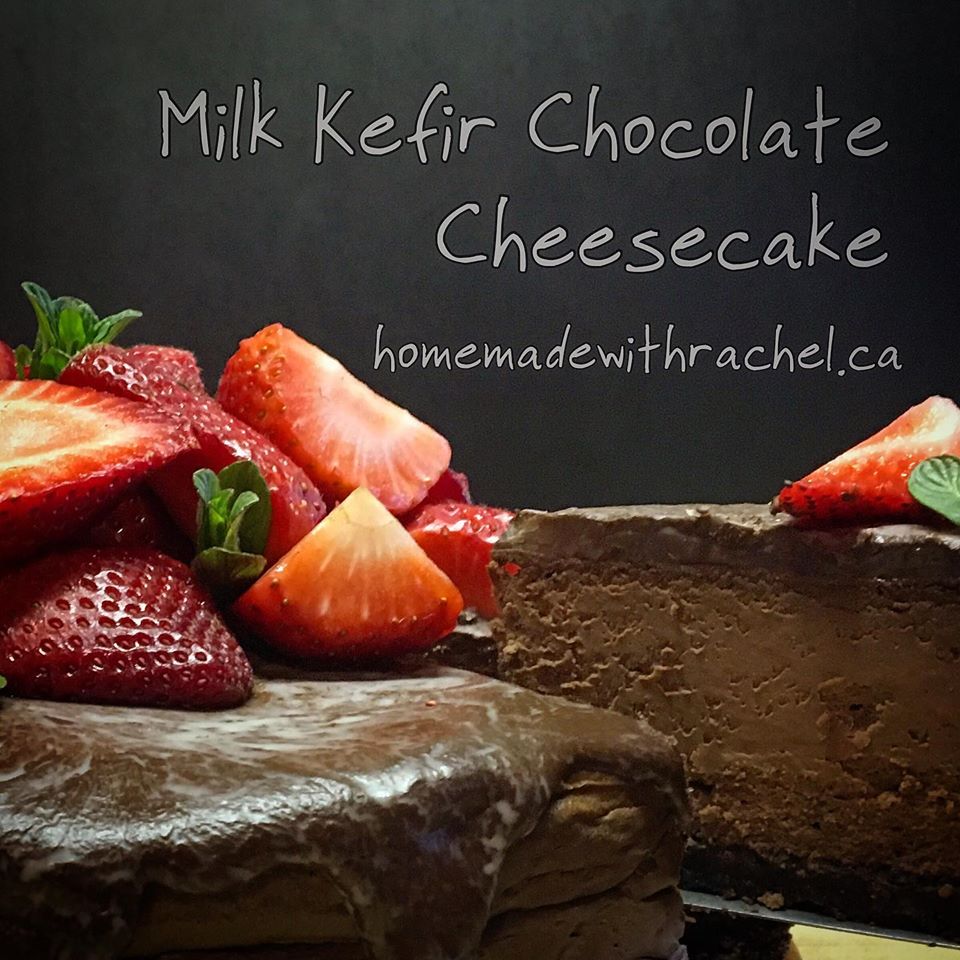  Instructions:
Tip:
To learn how to make Milk Kefir, click here: http://www.homemadewithrachel.ca/ferment/how-to-make-milk-kefir To buy Milk Kefir Grains, click here: http://www.homemadewithrachel.ca/store/p30/Live_Organic_Milk_Kefir_Grains.html
0 Comments
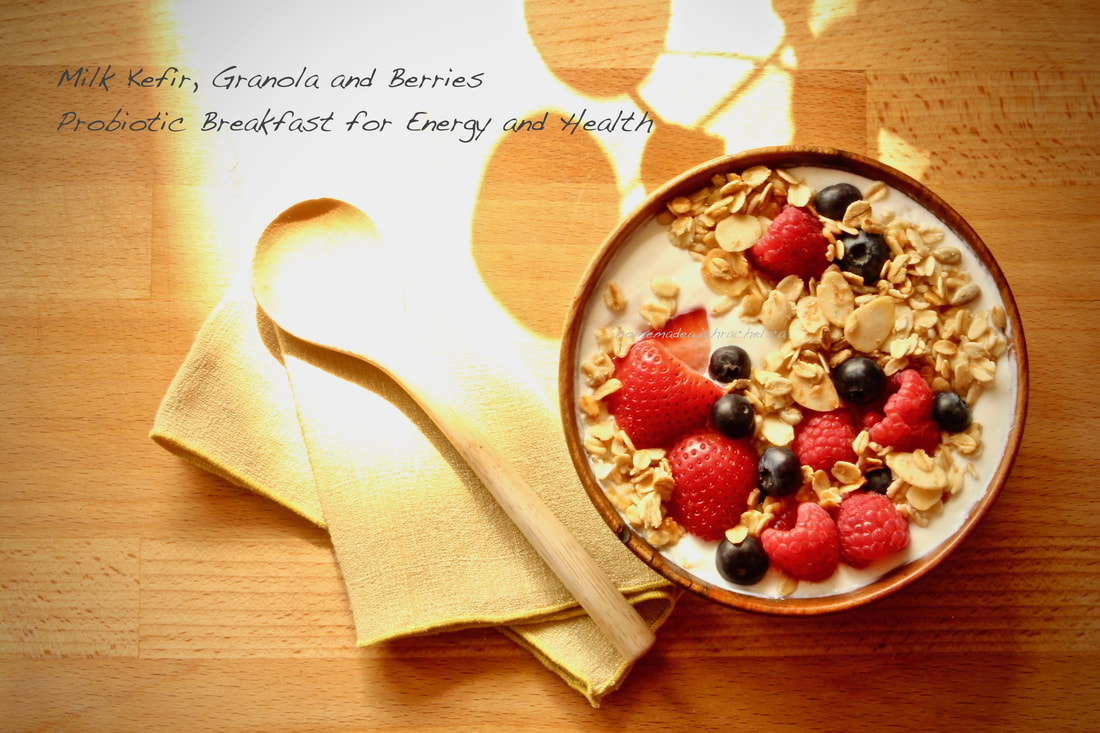 A large percentage of your immune systems is housed in your gut. For a healthy gut, consuming probiotics such as milk kefir, which are full of beneficial bacteria will help our digestive tract with digesting food. It also helps to absorb vitamins, and support our immune system. This will give one a fighting chance during cold and flu season. Start your day healthy with an easy and slimming breakfast so delicious, it could be eaten as a dessert, yet beneficial for an active lifestyle and brain function! This breakfast of champions will help one feel full and satisfied longer for many hours, without the insulin spikes often followed by sugary breakfasts nor the trigger of hunger pains related to processed breakfasts such as muffins and sugar-laden cereals. A bowl of milk kefir, granola and berries also helps to keep one alert and energised for hours. Each component helps provide protein, and nutrients, helps fight inflammation, and lower cholesterol levels. Milk Kefir is a fermented probiotic drink made from diary of any kind. The live cultures stimulate your immune system, aid in digestion, and improves bone health among other things. To learn more and how to make your own Milk Kefir, click here. The berries are not a decorative token. Besides taste, they are high in antioxidants; and natural plant sugars for improved blood sugar and insulin response. The fiber in both the granola and berries helps to slow down food movement through your digestive tract leading to reduced hunger and increased feelings of fullness. Avoid granola with high sugars/sweeteners and oils. There really isn’t a recipe here to follow. It is simply an ensemble of ingredients that play well together. Milk Kefir is basically a blank canvas you can colour anything with! You could also use yogurt which is slightly thicker. However, milk kefir has more probiotics and protein.  You can also put it all in a jar as a packed lunch for work or school. Ingredients 1 cup milk kefir (more or less) ½ cup of low sugar granola or muesli (more or less) Handful of berries Optional: Maple syrup, honey, or sweetener of your choice Fresh fruits, or dried fruits such as goji berries or raisins, coconut flakes, seeds and nuts Method Combine milk kefir, granola (or muesli) and as many berries as you desire into a cereal size bowl. Enjoy! For a transportable packed lunch: Either the night before or in the morning before work/school, layer all ingredients into a non-corrosive (such as glass) 2 cups or more size container, with an airtight lid (I don’t use any kind of plastic but you can). Don’t forget your spoon! Tip #1: For take-outs, you can also bring the ingredients separately in containers or bags to be combined on-site. Tip #2: Adding a piece of washed organic orange or other citrus peel to your homemade milk kefir and fermenting it a second time will increase the vitamins due to prebiotics in the fruit. It will also help to mellow the tang of the milk kefir, besides offering a zesty deliciousness to the drink. Note: the white part of a citrus peel called the pith will make the milk kefir bitter if left for too long. Make sure the pith is not attached to the peel when adding to other ingredients if you do not prefer a bitter taste. Side note: You can purchase milk kefir in stores, but make sure it is not filled with added sugars and fillers. Homemade kefir is better and easy to make. You can order milk kefir grains here: http://www.homemadewithrachel.ca/store/p30/Live_Organic_Milk_Kefir_Grains.html 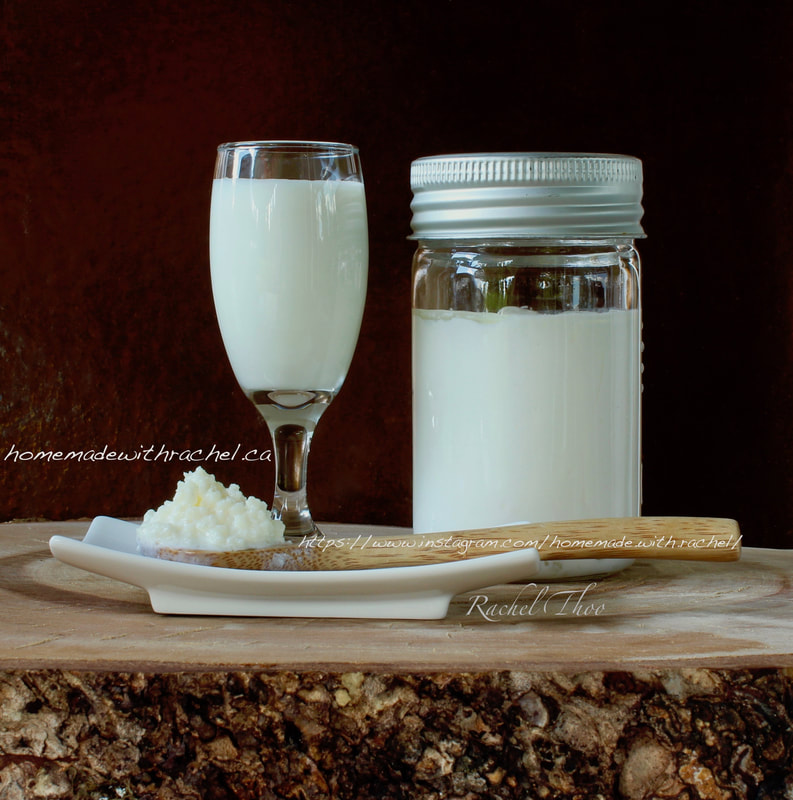 In recent years, there has been a strong interest in beneficial fermented foods with natural occurring probiotics, such as milk kefir. Store bought milk kefir is usually pasteurized with most of the beneficial microbes destroyed during the process. This is to ensure uniformity and shelf life, but it also limits their good bacteria to a minimum amount. Traditionally homemade milk kefir contains billions of CFU (colony forming units), a spectrum of beneficial microbes, which is the whole point of eating probiotic foods. Can you spare 3-5 minutes a day? That is how long it would take to make milk kefir. It’s easy, and cost effective, and superior to store-bought. What is Milk Kefir? Milk Kefir is a drinkable fermented milk product with a slightly tart taste much like yogurt, and a creamy consistency. There are far more strains of microoganisms in kefir than that of yogurt, making it an excellent source of probiotics. It is pronounced ‘KAH – FEAR’. Milk kefir grains are a living organic culture made up of proteins, sugars, and fats. It is composed of living colonies of various yeasts and bacteria existing in a microbial symbiotic matrix. These microorganisms ferment the lactose in the milk over the course of a day, resulting in a tart and effervescent drink beneficial for its probiotic qualities and gut health. Health Benefits of Milk Kefir Milk kefir is a good source of Calcium, B12, Magnesium, Phosphorus, Riboflavin, and some vitamin D. It contains antibacterial properties to protect against infections, and boost your immune system. Kefir increases the absorption of calcium beneficial for bone health, and lowers the risk of osteoporosis. How Is Milk Kefir Made? Milk kefir is produced by inoculating milk with kefir starter culture called grains and fermented over time. The grains range in colour from pure white to yellowish white. White is the acceptable colour of healthy grains. Yellowish white is the outcome of leaving the grains in the same milk during fermentation for longer than the optimal 24-hour period. They may grow from the size of a rice grain to as large a clump as a cauliflower floret. After successive fermentations, kefir grains can divide into a new generation of grains, which have the same characteristics as the old ones. In short, they make babies and multiply when healthy! Traditionally, milk kefir is made using cow, ewe, goat, or buffalo milk. Raw – unpasteurized whole fat milk has been used with kefir where milk kefir originated somewhere in the Caucasus and Persia. These days, you have the choice of raw, pasteurized, organic or non-organic, full fat, reduced fat, homogenized or a mixture of such milk treatments. You can even use cream! Cow milk will produce a thick, smooth milk kefir, whereas goat milk will create a thinner finish. Sheep and buffalo milk is sweeter and contains more protein, resulting in a thicker, and creamier milk kefir. I highly recommend you use organic full–fat whole milk. The only kind of milk NOT recommended for milk kefir is ultra-high temperature treatment (UHT) milk. However, animal milk might be scarce, expensive, or not consumed due to dietary constraints, preferences, or religious customs. In this case, soy, coconut or almond ‘milk’ can be used in place of animal milk. If you choose to use non-animal milk, note that it is important you put kefir grains in animal milk every few days for a period of 24 hours. This process allows the grains to feed and rejuvenate. You may rinse it with a non-dairy ‘milk’ if you prefer not to consume the slightest bit of dairy. Do not rinse your milk kefir grains in water. Milk Kefir Recipe Ingredients 1 tsp/5 ml of milk kefir grain for every 1-3 cups of milk or 1 TBSP/15 ml of milk kefir grains per 1 quart/1 liter of milk or more * The ratio for grains to milk depends on the temperature of the room, the amount of time you would like it to ferment, etc. More grains mean less fermentation time. A warm room will also ferment the milk kefir quicker. Supplies needed:
Instructions
Milk kefir grains are available to purchase here.  Rose Lassi: Drink of the Gods and Goddesses Milk Kefir is versatile. You can use it in place of yogurt in most recipes. You can make lassi, dips, ice-cream, labneh, etc. The possibilities are endless. Milk Kefir Hotel: Milk kefir grains can be stored in a "hotel" for a period of time when you are taking a break, or if you have too many grains. With a hotel, you are ensured a backup of milk kefir grains if anything should happen to your ferment. To keep extra grains, simply add enough milk to cover them; let the grains ferment for an hour or 2, and then transfer the jar to the fridge. I like to refresh my hotel milk kefir grains every 4-7 days. When you need a break of 2-3 weeks, add 2-4 cups of milk to 1-2 tsp of milk kefir grains, depending on how long your break period is. Let it sit for an hour at room temperature to get a head start on their feeding, and then refrigerate. Your grains need to be actively culturing for at least a month before putting them away to "sleep" in a hotel. It may take a couple of tries to "wake" them up when you resume your daily milk kefir fermentation with fresh milk. * If you need to rinse your milk kefir grains, rinse them in milk. DO NOT rinse them in water. This is a video I made to show how easy it is to make milk kefir! Follow me on: https://www.instagram.com/homemade.with.rachel/
Subscribe to my Youtube channel: https://www.youtube.com/channel/UCAFl_CDC5YmsJUqoC6j519Q  There are many ways of utilising sourdough starter discard. Here is one of them. I personally have always found a way to repurpose the discard. Perhaps it should not be called a discard. Why not called it a repurposed sourdough starter? This is a versatile recipe you can add or omit a variety of accents, such as, cheese, herbs, citrus zest and juice, a bit of bacon, or... The dough is essentially a blank canvas in which you can paint an array of colours and textures. With the summer/autumn garden abundance, fresh herbs and flowers such as rose, nasturtium, lavender are a fresh fragrant uplift. You can use dried herbs/flowers if you wish. Spices, such as paprika, cayenne, peppercorn, turmeric, garlic powder and ginger powder can also be playfully added, as well as poppy seeds, sesame seeds, and nuts. Keep is mind, adjustment may be needed depending on the combination of flavourings used. For best results, it is best to weigh your ingredients for accuracy. 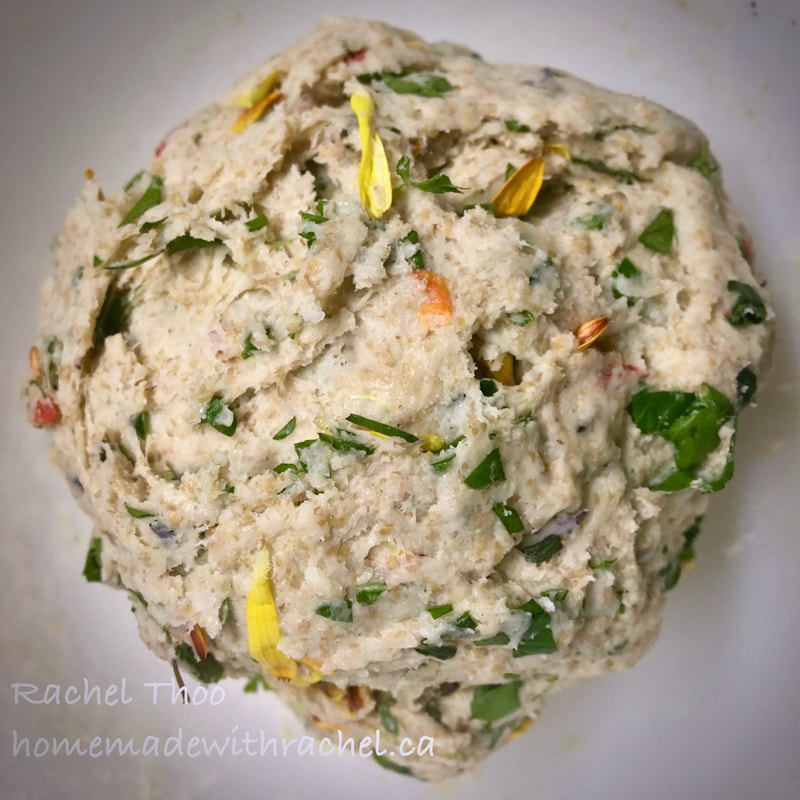 Ingredients 120 grams (4.25 oz) (1 cup) organic all purpose flour (you may add a percentage of whole wheat, rye, etc to your liking) 2ml (½ tsp) baking soda 2ml (½ tsp) baking powder 2.5ml (1 tsp) sea salt 8 -15ml (½ - 1 Tbsp) sugar (optional) 50 grams (2oz) (½ cup) - more or less of herbs/flowers or 30ml (2Tbsp) dried herbs (optional) Spices (amounts to your liking) 100 grams (3.5oz) (7 tbsp) butter, bacon fat, lard, coconut/olive oil/vegetable oil 65 grams (2 oz) (½ cup) extra sharp cheddar cheese, shredded (optional) or 50 grams (2 oz) (½ cup) of fresh Parmesan cheese, shredded 250 grams (8 oz) (1 cup) starter discard 100% hydration starter (add water as needed if you use a lower hydration starter) A pinch or two of finishing salt (optional) Cracked peppercorn, sesame or poppy seeds (optional) 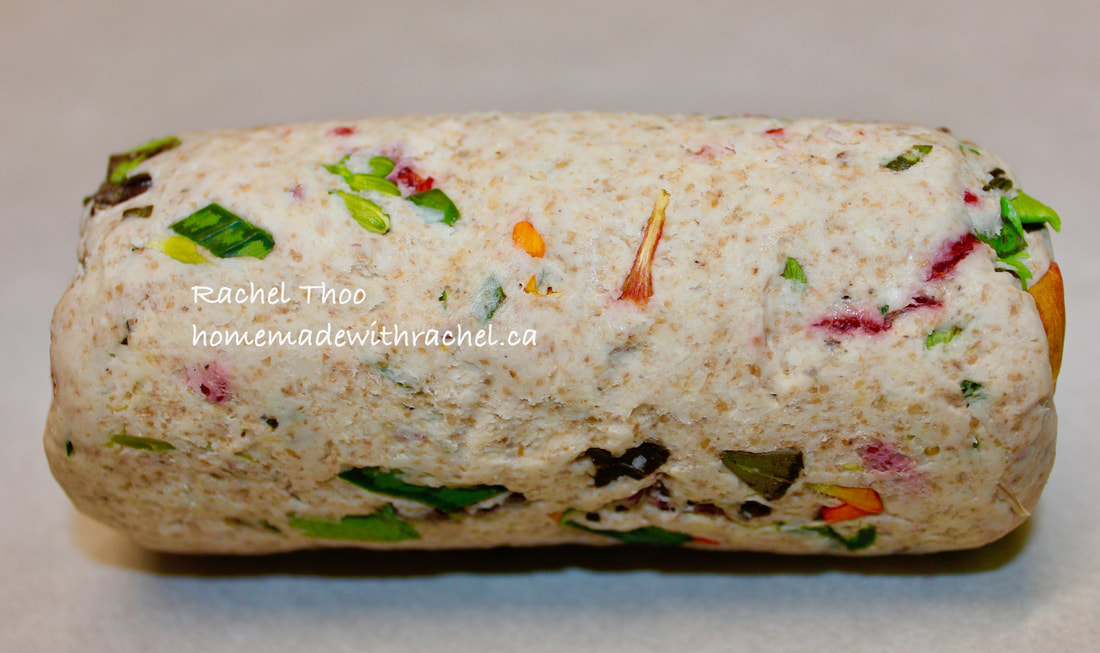 Directions You can use a food processor, a wooden spoon, or your most trusted tool - your hands/fingers to mix the ingredients together. In a medium size bowl, mix all dry ingredients together. Add butter/oil & cheese. If using butter, bacon fat, lard or solidified coconut oil, cut it into roughly 8-12 pieces. If using liquid oil, drizzle over dry ingredients as you mix. Mix until the butter/fat/oil is cut into the flour & has a coarse-sand texture. Add your flavourings such as fresh/dried herbs and flowers, spices, cheeses. Add starter & mix until it just comes together as dough. Knead very briefly to form a ball. Do not over-mix. It should be a very soft, but non-sticky dough. Put in a bowl, cover with plastic wrap, let sit at room temp for 30 minutes to 12 hours or refrigerate overnight. The longer it sits, especially in room temperature, the sourer it will become. 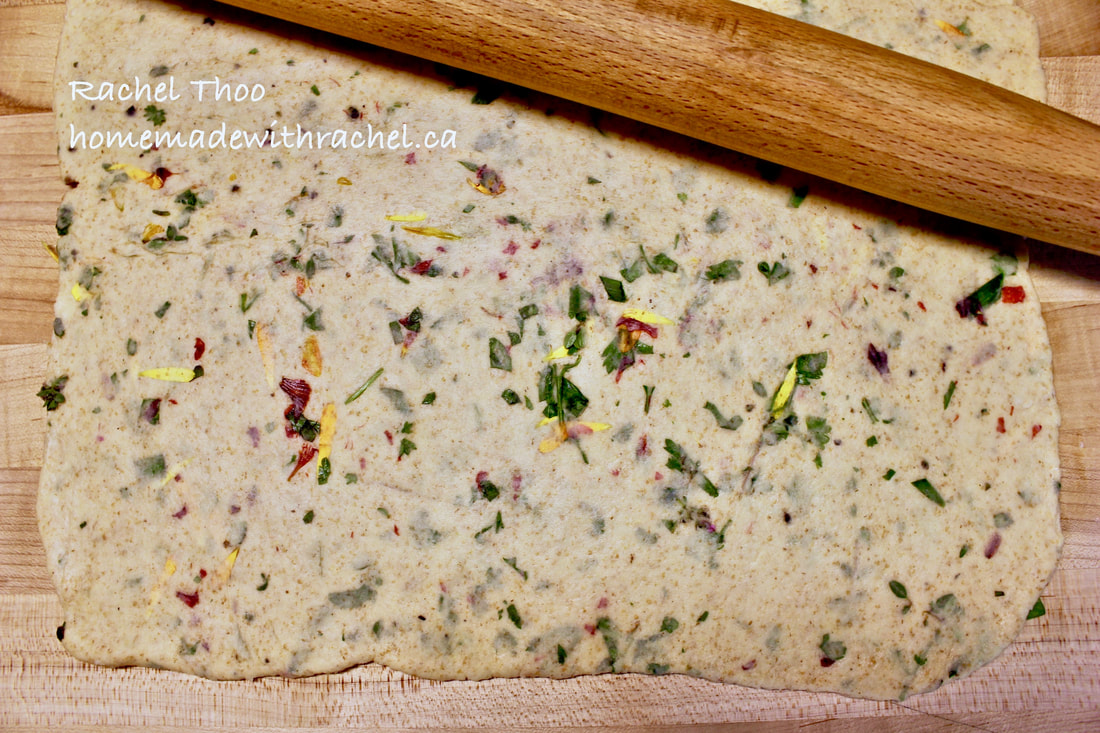 Cut dough ball in half. Lightly flour your work surface, or a piece of parchment paper the size of your baking tray. Roll out each piece of dough very thin, about the thickness of a dime. Each piece should fit a 30cm x 42cm (12" x 16.5") baking tray. 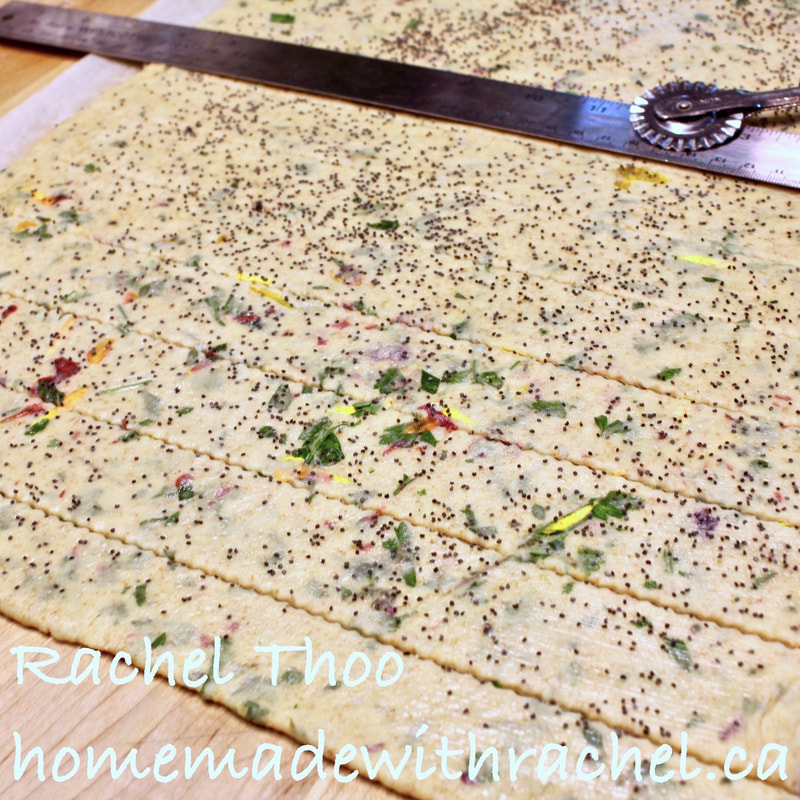 Slide rolled out dough onto baking tray. Using a piece of parchment paper makes it easier to transfer onto the baking tray, or simply roll the dough loosely onto a rolling pin and unroll onto cookie sheet. 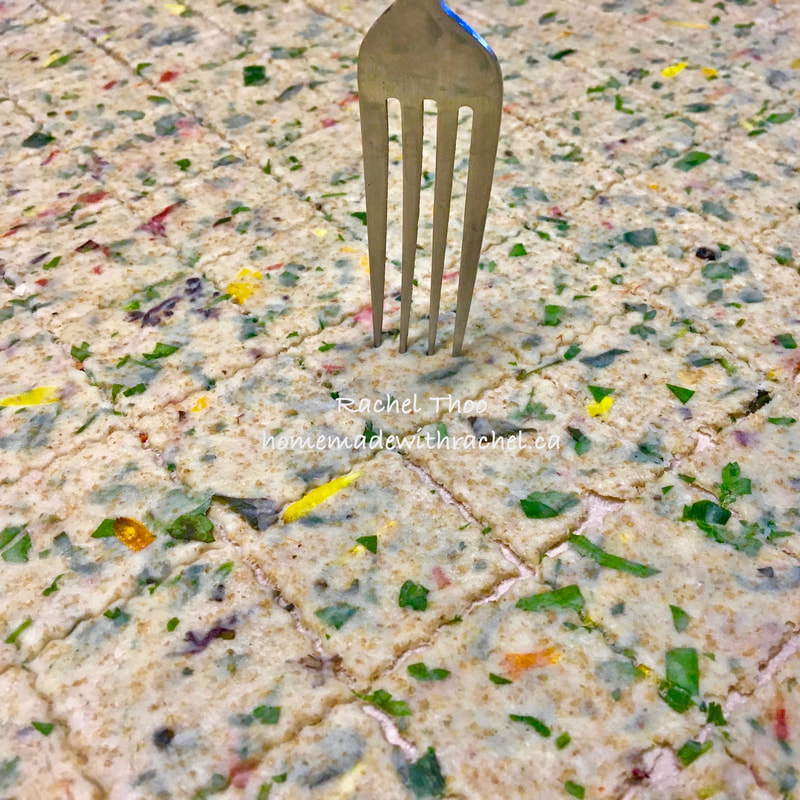 Score with a knife, pizza or pastry wheel. Prick each cracker with a fork. Sprinkle with finishing salt, pepper, poppy/sesame seeds or garnish of your choosing. 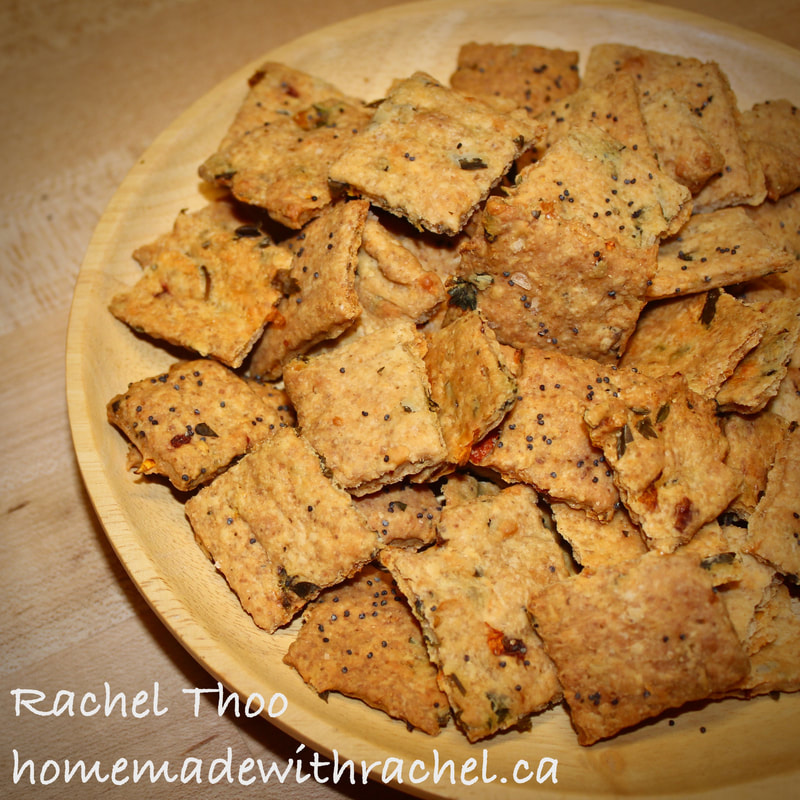 Bake at 325°F 165ºC for about 12-20 minutes, turning baking tray as needed for even baking. The crackers at the outer edge will cook faster than the middle ones. Towards the end, you will need to remove the crackers that are golden brown and crispy and let the middle pieces finish baking. Keep a close eye; they do go from done to burnt very quickly. Transfer them to a cooling rack. Store in an airtight container at room temperature for up to a week; or store in freezer.  Notes:
I suggest to anyone who bakes frequently to invest in a kitchen scale. Measurement by weight is more accurate than volume. An active sourdough starter will have more carbon dioxide (CO2) taking up volume in the measuring cup. By weight, it is the same no matter the amount of expansion. It is the same as when you are bloated (gassy) and your pants fit tighter. Either way, you weight the same. Flour and brown sugar can be compressed or fluffed up which effects its volume as well.
 What are fermented foods?
Vegetables, fruits, herbs, legumes, nuts, meats and diary were first fermented as a means of preserving perishables. To get the most out of a harvest, people had to find a way to make the bounty last for winter, famine, or long distance transportation. While fermented foods were a necessary means of survival, it has also developed into an art form in many cultures. From sauerkraut, cheeses, sauces, and vegetables buried in earthen pots, these foods have been enjoyed and sustaining humans in various cultures and civilizations for thousands of years. Fermentation not only prolongs the life of the foods in a healthy, sustainable way, the food is preserved without the use of chemical preservatives, relying on microbes to do the job for us. Fermented foods are whole foods that, with the help of microorganisms, go through a process called lacto-fermentation. The natural beneficial bacteria feed on the sugar and starch in the food converting it to lactic acid, which is what gives fermented foods the sour taste. This form of preserves creates beneficial enzymes, b-vitamins, Omega-3 fatty acids, and various strains of probiotic powerhouses. This boosts levels of good bacteria to improve your overall health and balance your body’s collective microbiome, which in turn will aid your digestive system. A healthy microbiome will also increase immunity, reduce chance of disease, lower blood pressure and help maintain a healthy weight. The typical modern North American diet is actually one of the only diets in the world that doesn’t include fermented foods. Traditional foods such as miso and sauerkraut help to aid our gut and digestion. Even root beer started out as a fermented medicinal drink. Ginger ale and root beer were so popular that the food industry caught on, and manufactured soda pop was born to replace what was once a naturally effervescent health drink. Our ancestors learned the benefits of fermentation early on, but for some reason, we’ve gradually replaced a nutritious diet with “better living through chemistry” in the last century. You probably know that brined pickles, soy sauce, wine and yogurt are fermented, as well as cheese and sourdough bread. Did you know that chocolate is a fermented product as well, or that dry aged beef and other meats are, in a sense, fermented products, allowing microbes to break down the enzymes in the meat enhancing their flavour and texture? There are literally thousands of fermented foods across the globe. Natto, tempeh, rejuvelac, kvass, kombucha, marmite, ginger beer, brined cucumbers, miso, doenjang, lukfish, dosa, water kefir, and braga to name a few. When a food is fermented, it encourages the growth of good bacteria, while preventing the growth of spoilage-causing microorganisms. Fermentation helps to improve the biological value of your foods, therefore increasing the nutritional value for your digestion. In the fermentation process, the food is broken down or predigested as it ferments, which makes it easier for the body to process. It also has a unique ability to ease stomach discomfort from too much or too little gastric acid by adjusting it’s acidity; this helps to produce acetylcholine, a neurotransmitter for facilitating the transmission of nerve impulses, which aids in bowel movements and constipation. Over-usage of antibiotics and antibacterial soaps can cause resistance, killing other good bacteria, but will allow this resistant subset to proliferate. Antibiotic use destroys the normal balance of gut flora and leaves an open field for bad bacteria and fungi to move in. Moreover, over-consumption of simple sugars & refined carbohydrates will feed the bad yeast. Once the immune system is weakened, or there are not enough good bacteria to combat the bad yeast, then it begins to grow unchecked and cause symptoms, such as “leaky gut.” With a diet of sugars and over-processed foods, people today are also struggling to keep their bodies as healthy and happy as those who lived before us! When there aren’t enough good bacteria to aid digestion, poorly digested food can lead to putrefaction (rotting) which would encourage the growth of unwanted organisms and eliminate good bacteria. Beneficial bacteria is a natural part of the food chain, that when coupled with active enzymes, ensures the foods we eat are broken down, effectively absorbed and utilized by our body. Studies have shown that beneficial bacteria help balance the gut flora in your digestive system and reduce the levels of toxic pathogens that cause ill health. Additional research also suggests that the regular consumption of live lactobacilli bacteria can improve your gut flora and reduce the number of infections by reducing harmful bacteria. When you start learning to ferment your own foods, you will begin to understand the way that microbes can actually provide better protection from pathogens than sanitation can. In fact, the lactic acid produced by the bacteria that make sauerkraut sour is so effective at killing food-borne human pathogens, the pork industry has begun using lactic acid to prevent Salmonella. (1) Why are good bacteria important? The word “probiotics” means pro-life, as opposed to antibiotics. We may think of bacteria as tiny creatures that we sometimes refer to as germs - those living critters that cause nasty diseases. Bacteria are responsible for such human diseases as food poisoning and pneumonia. They can also cause seasonal allergies, migraines, and tiredness in people if your gut and digestion aren’t in good health. The gut is very important to the immune system, and an unhealthy gut can have serious implications for your overall health and well-being. Think of it as a well-working plumbing system! Good bacteria are extremely beneficial to living things, including humans. In the soil, bacteria break down organic matter and make natural chemicals available to living organisms. Beneficial bacteria and active enzymes ensure the foods are easily absorbed, digested, and utilized in our bodies. New studies have shown that a large number of health concerns and diseases can be traced back to an overload of toxicity from stress, an unhealthy acidic diet and excessive exposure to environmental chemicals and pollutants, which could impact your gut and digestive health. Why is digestion so important? The great thing about the lacto-fermentation process is that the tough cellular walls of vegetables are broken down, allowing for much easier absorption by the body. During fermentation, the vitamin levels actually increase along with enzyme levels, often by 2 to 3 times, while the levels of beneficial probiotics can exceed the numbers of any probiotic supplement. These great lacto-bacilli help to build the flora, good bacteria in the digestive tract, which in turn builds and supports the immune system. Adults have approximately 2 kilograms of bacteria in the lining of our gut and bowel wall. Those 2 kilograms are compiled of approximately 85% beneficial bacteria and 15% harmful bacteria. Just like your vegetables in your garden, or harmony in your work or personal life, we can function well with this balance of bacteria. However stress, poor diet, malabsorption, antibiotics, or environmental and chemical pollutants, viruses or parasites can disturb this delicate balance. This condition is called ‘dysbiosis’. What is Dysbiosis? Dysbiosis is an imbalance in your gut flora caused by too few good bacteria and an overgrowth of bad bacteria, yeast, and/or parasites. You may have heard of the gut/brain connection. I am convinced that the wisdom of our ancestors, who coined the terms “gut feeling’ or “trust your gut instinct,” understood the true meaning of an emotional body response and respected their natural radar, having been hunters and gatherers. Your gut tells you when you are hungry, lovesick, stressed or have eaten something that has gone bad. Scientists call this little brain the enteric nervous system (ENS). (2) Studies suggest that 95% of serotonin neurotransmitters and feel-good hormones come from our gut rather than our brain, and 85% of our immune system is manufactured in the lining of our gut wall. Serotonin carries signals to the nerves. It is a chemical that is responsible for mood, and low serotonin levels can lead to depression. Therefore, a compromised gut does more than interfere with digestion. It may also alter your immune system and upset your hormonal balance. A dysbiosis will also cause mental fogginess, anxiety, depression and mood swings, an increase in colds, allergies, autoimmune disorders, skin problems, fatigue, headaches, gastrointestinal upsets and a slower healing process. Good Digestion Fermented foods are easier to digest because they're already partially broken down by the bacteria. When fermented foods are consumed in your daily diet you will notice the health benefits including lower cholesterol, less inflammation, healthy weight, better mood and brain function and proper digestion. This may help with back pain due to stress on the lower abdominal muscles besides releasing toxicities, and building a stronger immune system. In fact, Florastor is a brand name probiotic, Saccharomyces boulardii, used in hospitals to treat diarrhea and infections. Kombucha is loaded with this particular strain of yeast. Jarisch–Herxheimer reaction, Healing Crisis or Die-off Knowing exactly what is happening in your body is key to your healing journey. When you consume fermented foods for the first time, especially if you have many ailments, pay attention to what your body is telling you. A reaction may arise when large quantities of toxins are released into the body as the bad bacteria die-off. It can occur during antibiotic treatment or detoxifying too rapidly. Toxins are released as the “casualties” die off faster than the kidneys and liver can process. Gastrointestinal issues may initially worsen. You may also find you have flatulence, bloating or diarrhea. Some of us may develop flu-like symptoms such as fever, chills, muscle pain, hives and headaches, or a worsening of allergies. You may want to introduce these foods slowly into your system, increasing the amounts slowly. The Many Benefits of Fermented Foods Fermented foods are Mother Nature’s probiotics. They contain many live bacteria along with many other crucial nutrients. Here are some of the benefits:
Fermentation helps to increase the micronutrients of food, such as vitamin K2 (potassium), which help prevent arterial plaque buildup and heart disease. Fermented foods also create beneficial enzymes like vitamin Bs, vitamin A, vitamin C, Omega-3 fatty acids, and various other probiotics. Fermentation also eliminates anti-nutrients that interfere with absorption of nutrients. Phytic acid found in legumes and seeds can be broken down via fermentation so the minerals become available. Miso and tempeh are some of the examples of fermented legumes.
Your gut is your largest immune organ in your body. About 80 percent of your immune system is located in your gut. A proper balance of gut bacteria with digestive enzymes helps to absorb nutrients in the food, which in turn, strengthens you with natural supplements and vitamins. It is your top defense system against all disease. The chronic inflammation linked to diseases can begin with an unhealthy gut microbiota.
The beneficial bacteria in fermented foods are highly potent detoxifiers, capable of drawing out a wide range of pesticides, toxins and heavy metals. Fermentation breaks down the nutrients in foods by the action of beneficial microorganisms and creates natural chelators that are available to bind toxins and remove them from the body. Kimchi is known to be a powerhouse detoxifier.
Fermenting is an ideal way of preserving your summer harvest as well as maintaining your overall health, from making vinegars, yogurt, kefir, jun, kombucha, and preserves to making your own fermented sauces. It is also low tech and consumes a small amount of energy to produce. What a great way to do our part for climate change, and be in touch with the natural world, microbes and all. All you need is a knife, a chopping board, some earthenware or glassware, and food from nature! No canning, slaving over a hot stove, or expensive equipment required.
Incorporating a variety of fermented and cultured foods into your diet will ensure you'll get a much wider variety of beneficial bacteria than you could ever get from a supplement.
You cannot reap the benefits of raw vegetables if your gut flora is imbalanced due to the fact that you can’t absorb the nutrients. Cultured foods are pre-digested and processed by micro-organisms, making certain nutrients more available for absorption. Fermented vegetables contain higher levels of B vitamins, such as thiamin, riboflavin and niacin. The lactic acid produced during fermentation promotes the growth of healthy flora in the intestine needed for our microbial inner ecosystem to aid the digestive enzymes. This would ensure you get the most nutrients out of all foods you ingest. Besides increasing and preserving nutrients, fermentation also reduces anti-nutrients. Phytates, which are present in grains, nuts, seeds and legumes, bind to minerals, making those nutrients unavailable for absorption. Fermentation breaks these molecular bonds so the body can absorb them easily. Traditional Ferments vs Commercial Store-Bought Ferments Like most things in nature, “live foods” cannot be packaged or processed. Commercial “ferments,” while creating something 'safe' and with a shelf life, are usually pasteurized, which defeats the purpose of consuming them in the first place. “Live foods” are metamorphic, just like everything in nature, and their essence will somehow be lost in a superficial environment. Commercial products are usually geared for taste, not for health but for the bottom line, and filled with stabilizers, sweeteners and other additives. Commercial ferments such as yogurt have a high lactose content and are usually saturated with sugar, gelatin, and artificial flavours. Finding a “live” store-bought kefir is difficult; most are misleading even if labeled “raw” kefir. In order for Kefir to be the genuine article, it needs kefir grains, and not a powdered starter, which commercial kefir cannot do to keep a consistent product. Commercial sauerkraut, especially the canned versions, is likely pasteurized, which kills not only the bad bacteria but the beneficial bacteria as well, along with all the enzymes and nutrients. Commercial kombucha, by law, kills off yeast fermentation, thus killing off the good yeasts to avoid the alcohol content, as well as to prevent continued carbonation and the risk of bottles exploding. Many commercial Kombucha are also laden with sugar and pasteurized, negating the wonderful health benefits that are widely promoted nowadays. All in all, some commercial ferments may do more harm than good. Besides knowing what is in your ferments, homemade ferments will always be more delicious than commercial, and more cost effective. An added bonus is picking up a skill that is technical, scientific, as well as traditional. It will open up a whole new way of seeing living things and the cycle of life. To ensure you are getting the true taste and value of traditional fermented foods, make your own, or purchase from a small ferment company. Advise Disclaimer This information is not intended to be a substitute for professional medical advice, diagnosis or treatment. Always seek the advice of your physician or other qualified health provider with any questions about medical conditions. (1) The pork industry has begun using lactic acid to prevent Salmonella http://onlinelibrary.wiley.com/doi/10.1111/1541-4337.12001/full http://www.ncbi.nlm.nih.gov/pmc/articles/PMC4618844/ (2) Scientists call this little brain the enteric nervous system (ENS). http://www.hopkinsmedicine.org/health/healthy_aging/healthy_body/the-brain-gut-connection 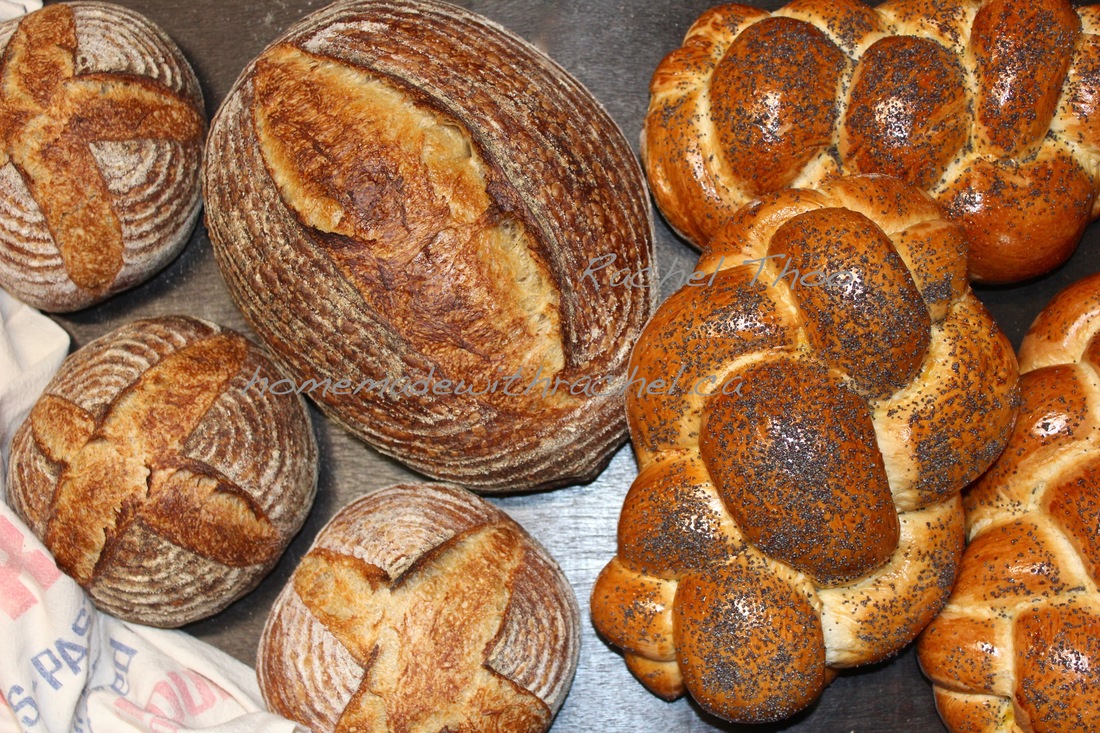 Chewy, soft, slightly tangy, mildly sweet and aromatic, a crusty loaf of sourdough bread made in a time-honoured tradition is a labour of craftsmanship, and an object of beauty, with a depth of flavour unachievable in yeast breads, commercially or homemade. 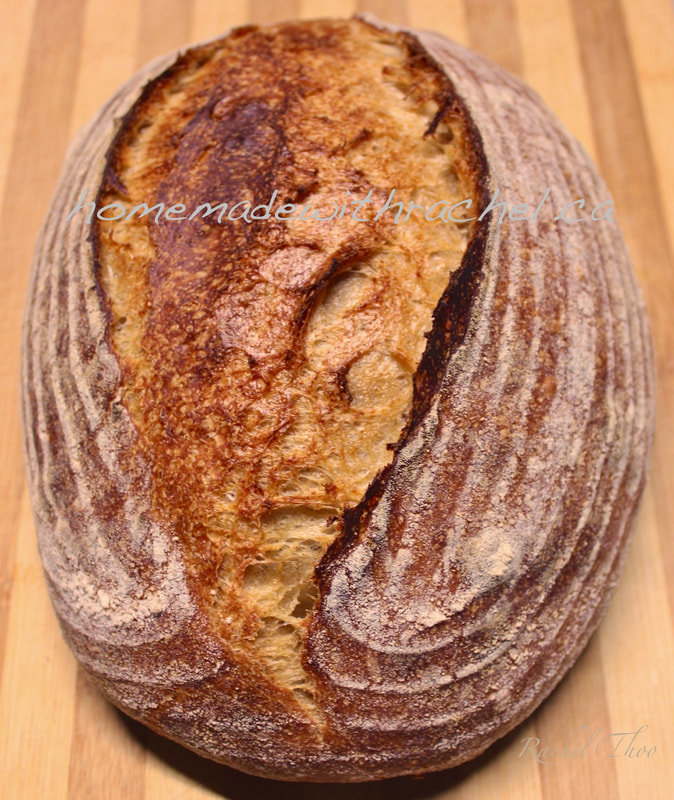 What is Sourdough? Sourdough is a North American term for a natural leaven of wild yeast and a bacteria called Lactobacilli, which is baked without the use of commercial yeast. The word sourdough does not necessarily mean your bread will taste sour. It refers to the fermentation process of water and flour in a culture called a starter or levain. Real sourdough is a simple method of leavening practised around the world throughout history. From Ethiopia’s Injera sourdough spongy flatbread made of teff, to Finnish rye bread, and India’s steamed lentil or rice cakes called Idlis, sourdough has been consumed around the world. 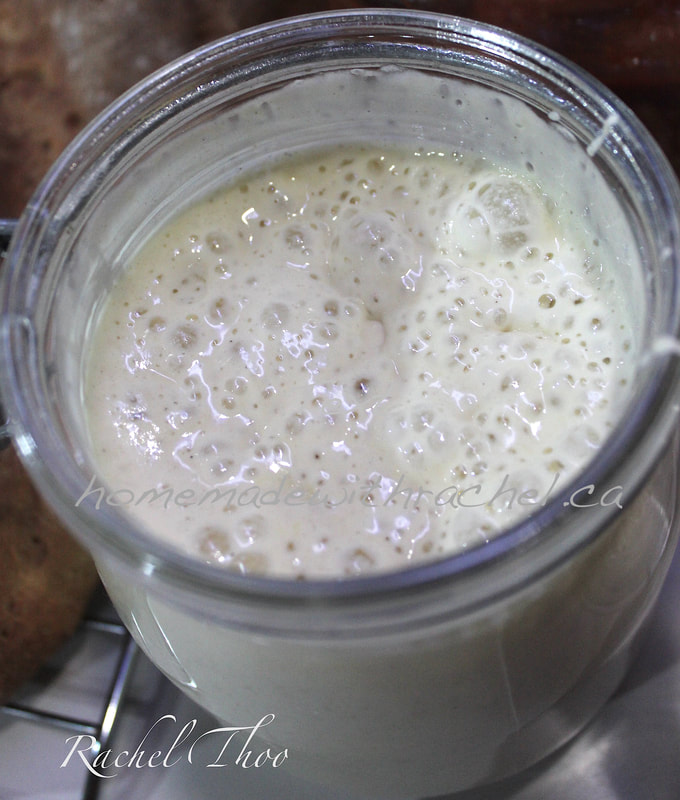 What is a Sourdough Starter? It is a ferment of wild/natural yeasts and lactobacilli acid bacteria (LAB) in a medium flour and liquid, such as water, which is propagated through ongoing feedings of flour and liquid. When flour is combined with water, microorganisms living on the grains begin to digest the starches and sugars in the flour, producing carbon dioxide, alcohol and enzymatic activity. The ongoing feedings are needed to keep the culture alive, like a newborn baby who is totally dependent on you. 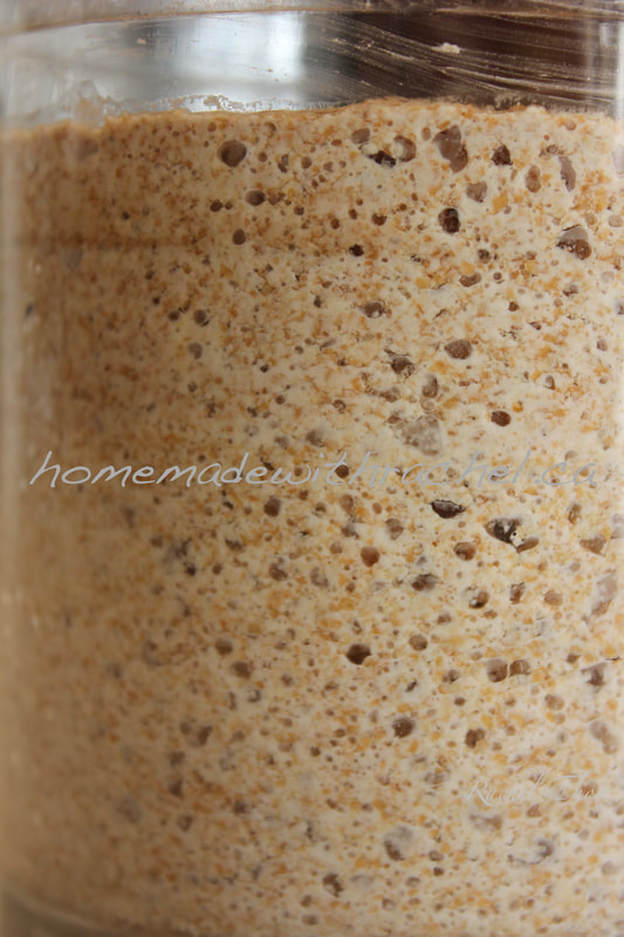 What are the Health Benefits of Eating Sourdough Bread? Sourdough is highly digestible and more nutritious than commercial yeast breads. Fermentation produces lactic acids which make the vitamins and minerals in the grains more readily absorbed in the body by neutralising the phytates in the flour which interfere with absorption. The principle storage of phosphorus, such as those found in the bran of wheat is called phytic acid. This phytic acid inhibits enzymes which are needed for the breakdown of proteins and starch in the stomach. It’s the lack of enzymes that results in digestive difficulties. The wild yeast and lactobacillus in the leaven neutralise the phytic acid as it proofs and acidifies the dough, which makes it easier to digest. The phytic acid is a strong chelator (binder) of minerals, such as calcium, magnesium, iron and zinc, making these important minerals unavailable to us, causing deficiencies. Long slow fermentation of wheat can reduce phytates by 25%-90%. Slow fermentation also increases folate levels in sourdough breads. The acids also slow down the rate at which glucose is released into the bloodstream and lowers the bread’s glycaemic index. That also renders the gluten in flour more digestible, and less likely to cause food intolerance. Rye sourdough bread is especially good for regulating blood sugar levels.  Note: The probiotics in sourdough bread is killed off during baking. Remember, they are living microorganisms, and heat will kill them off. However, there are studies suggesting heat-killed probiotics may be beneficial in other ways, such as miso soup. In any case, there are other health benefits associated with sourdough. The long slow fermentation stage also deepens the flavour, and improves the texture of the bread. Different grains enhance the flavour profile of the breads, while promoting a higher consumption of fibre and nutrition. Sourdough bread is commonly made without any sweeteners or oils, although you may enhance the flavour of sourdough bread with sweeteners, oils, and other flavourings. It contains mainly flour and water, with a pinch of salt. It stays fresher longer than factory loaves without added preservatives. To make your own sourdough starter, check out The Birth of a Healthy Sourdough Starter or if you would like to purchase sourdough starter, click here. 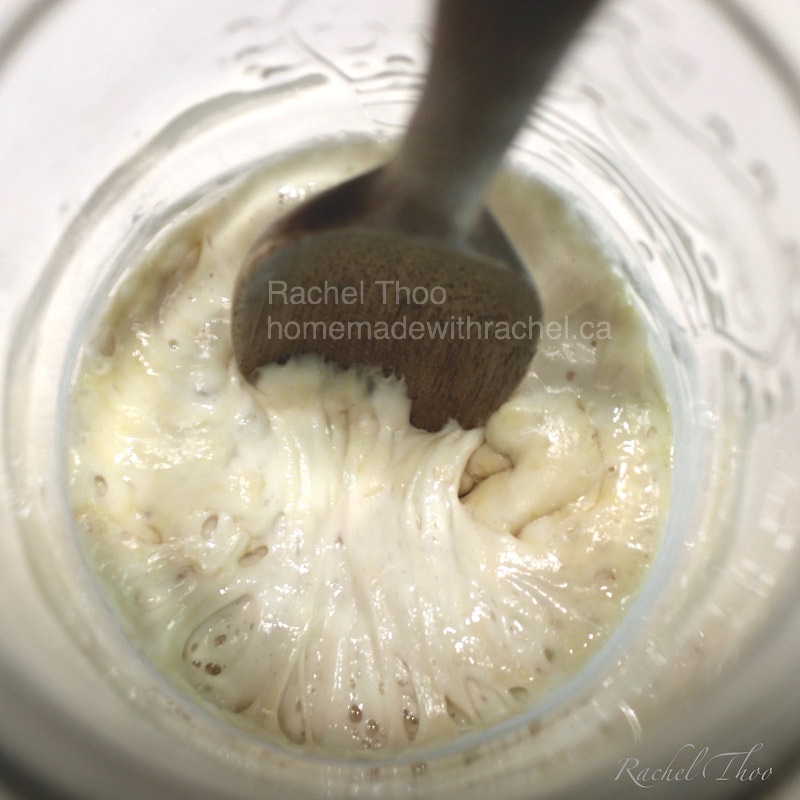 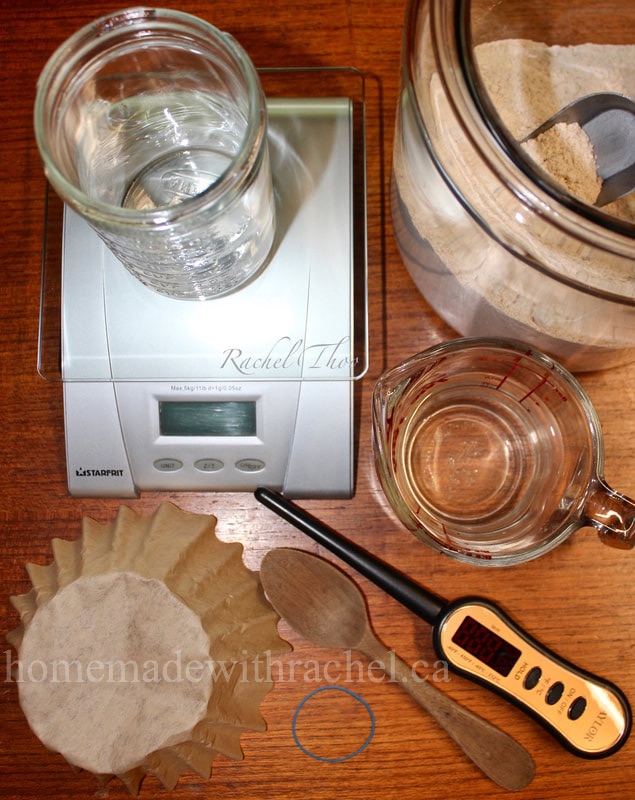 How to Birth a Starter: Making sourdough bread is committing to a relationship with your starter. Think of it as your new born baby since your starter is also a living organism. It needs regular feeding at intervals, and they are all different with their own quirky characteristics. Although a step by step set of instructions may help guide you, just like a formula for your newborn baby’s feeding and napping schedule, adjustments will be needed on an individual basis. What do I Need to Make a Sourdough Starter? Container: You will need a clean non-reactive container that is at least 3-4 times taller than it is wide, preferably glass which helps you see the activity in your starter. Pottery, and good quality 304 & 316 grade stainless steel is usable. You may use food grade plastic, although plastic has a tendency to harbour bacteria and smell, and environmentally not a good choice. Do not use any other kinds of metals. The acid in the starter will eat the metals and therefore leach into your starter. A clean loose fitting lid, cloth or paper coffee filter with rubber band to keep flies, and dust away from the starter. Do not use cheese cloth. Fruit flies can penetrate through the open weave. You can have a snug fitting lid or a loose lid. Oxygen is good to help get the fermentation going for flourishing yeast activity, but most of the micro-organisms are anaerobic such as Lactic Acid Bacteria. Spoon: Non-reactive stainless steel spoon, at least 18/8. A digital kitchen scale: The formula for a starter is normally 50 percent flour + 50 percent water by weight, not volume which comes to 100% hydration based on Baker’s Percentage. Measurements in cups are not as accurate. The same flour weighed one, twice, thrice in a measuring cup will never come to the same conclusion, and a cup of water does not weigh the same as a cup of flour. It is faster, consistent, more accurate and easier to increase or decrease your portions accordingly on a scale, thus the reasons bakers use weights rather that volume. Nonetheless, I have given provisions for those without a scale to use measuring cups and tablespoons. *Weigh and write the weight in grams with a marker on the outside of your clean and empty container before you add your flour/water mixture. This will come in handy when adding or subtracting to your starter. Thermometer: Not crucial but helpful. Flour: The best flour for a starter is fresh wholegrain, especially rye due to the abundance of microorganisms necessary for fermenting. Use fresh unbleached, unprocessed organic flour. The chemicals in bleached flour will kill the crucial microorganism living in the flour. Water (or Juice): Use pure water. Microorganisms are sensitive to chemicals such as chlorine which kill pathogens such as bacteria, good and bad. You may set your chlorinated water out in a container overnight to let the chlorine escape. Distilled water is not recommended since minerals in pure water help keep the starter healthy. Pineapple juice could be used for those who have a difficulty with starting a culture. The acid in pineapple helps to encourage the right microorganisms to develop. Thus, it will not develop a cheesy or stinky feet smell notable in the first few days of a flour and water solution, especially in a white flour and water solution as the good and bad bacteria fight for dominance. See troubleshooting notes. If you want more info, Google “The Pineapple Solution” by Debra Wink. Day 1: Weigh your clean and empty container and mark the weight of your container Set your scale at 0 grams Add 40 grams (3tbsp) of water or juice, preferably 25-28ºC/77-82ºF Add 40 grams (5tbsp plus 1 tsp) of flour of your choosing Total = 80 grams Stir well to incorporate. I try to keep the sides as clean as possible by wiping the inside and outside of the container everyday after feeding to prevent mould. It also helps me to see what is going on in the container as the starter begins to rise and fall. Using a rubber band or a marker on the outside of the jar to mark the height of the starter in order to tell if your starter has risen and fallen. Cover the container, and place at room temperature between 20-25ºC/68-77ºF. Day 2: Do not feed. It usually takes more than 24 hours to begin fermentation. If you keep feeding before it has a chance to ferment, it slows down the process, and invites mould. Give it a stir, clean the sides and leave for another 24 hours. *If by any chance your starter has started fermented (you will see bubbles), skip Day 2 and proceed to Day 3. 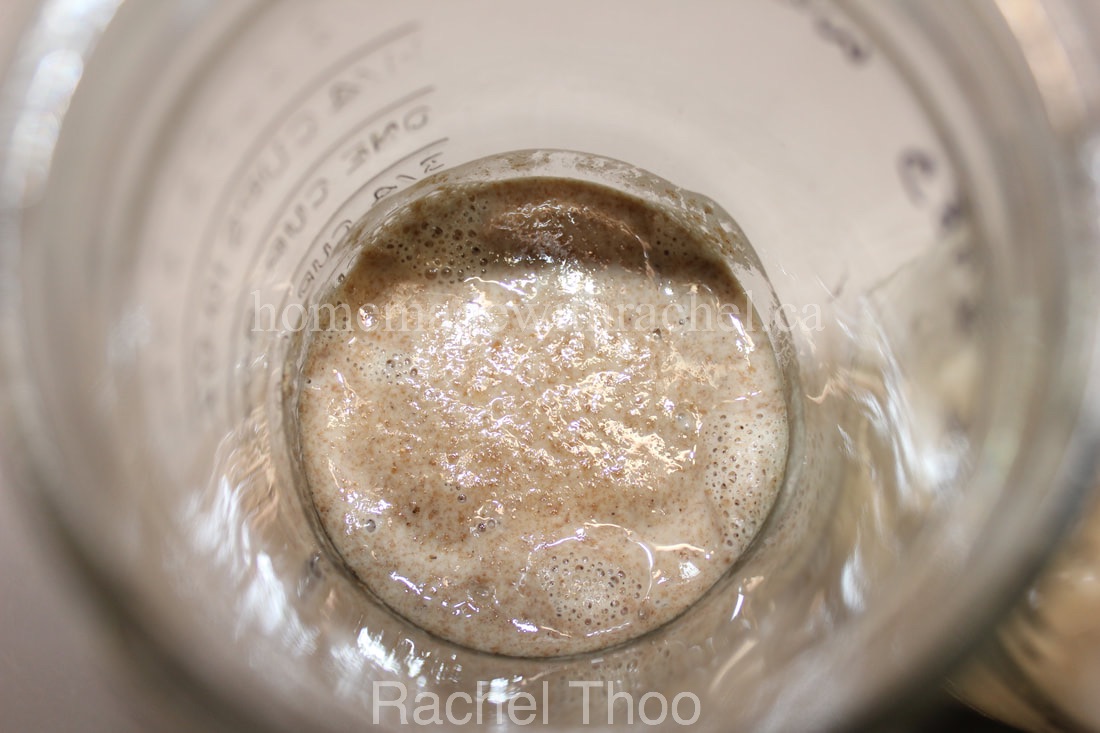 Day 3: If your starter is showing signs of good fermentation, Discard all but 20 grams of starter (1tbsp) Add 30 (2tbsp) grams water or juice Add 30 (scant 4tbsp) grams flour Total 80 grams Do not use your discard for sourdough discard recipes yet. It does not have significant good bacteria and yeast. If your mixture has no or very little activity, stir and follow Day 2 again. Day 4: Repeat Day 3. * If your starter was doing well on Day 3 or 4, and rose more than double, but seems to have lost its vitality the next day or two, that is because it is called a “false start” similar to a “false labour” in pregnancy. It may even have a bad smell, more noticeable in white flour solutions. The activity produce in your starter is caused by a gas producer Leuconostoc species of bacteria. After numerous feedings, the smell will dissipate, which means the beneficial Lactic Acid Bacteria (which is what makes a great sourdough starter) has taken over, and should spring back to action. Day 5: If not much is happening, continue as in Day 3 If your starter is active, showing signs of bubbles, and rising at a good rate to almost double the height or more, Discard all but 30 grams of starter (a heaping 1tbsp) Add 35 grams water (2.5tbsp) Juice is no longer necessary if acidic enough Add 35 grams flour (4tbsp plus 1tsp) Total 100 grams * If the starter starts to smell like alcohol or acetone, it means it needs to be fed more or more frequently. Day 6 If your starter has double within the first 12 hours and fell, it will need to be fed more or twice in a day. If not, continue as in Day 5 or Day 3, depending on how your starter is doing. You can either feed it twice with the formula for Day 5 or Discard all but 20 grams of starter (1tbsp) Add 40 grams water (3tbsp) Add 40 grams flour (5tbsp plus 1 tsp) Total 100 grams Day 7 By now, your starter will give you an idea of its routine. If it is active, bubbly and fermenting at a good rate with a predictable rise and fall, you can continue with the formula for Day 6. At this point, if there is no cheesy or stinky feet and it smells sweet and tangy (rye flour will have a nice apple scent), you can use the discard for pancakes, etc. You will find many recipes online. 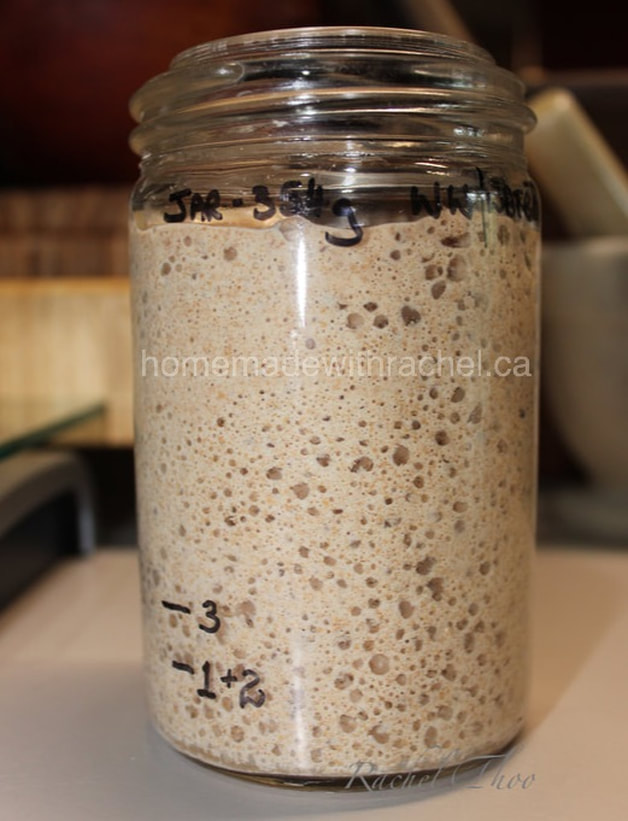 Day 8-14 Discard of all but 20 grams of starter (1tbsp) Add 40 grams water (3tbsp) Add 40 grams flour (5tbsp plus 1 tsp) Total 100 grams At any point after Day 7, you may want to experiment with some sourdough discard recipes, and may even try baking a loaf of bread. By Day 12, you should have a strong enough starter to bake loaves of sourdough bread with much depth and characteristics. Congratulations. You have birthed a healthy sourdough starter. Seasoned bakers will bless their starter with a name. I call my starter “Adam Levain.” Do not refrigerate your starter yet. You need to make your starter strong and steady at this point by regular feedings of once or twice a day, depending on your schedule or how fast your starter is rising and falling. This is the maturing period for your starter. If your starter is sluggish and not fermenting well, try adding a higher ratio of flour and water to your starter, or discarding more of the old starter. A lot of people make the mistake of thinking they need a higher ratio of starter to flour/water solution to make it healthy and active. Let me remind you that it’s like a small child that needs to be feed more when weak. After 14 days and onwards: At this point you can keep feeding starter every day at regular intervals of 12 or 24 hours, or keep it in the fridge and take it out a day or two before baking - refresh with feedings. You will need to know your levain, pay attention to the temperature of your environment, the effects of various type of flour and water used, etc. A 3 week old levain, fed everyday, is fully matured. Note: feeding your starter every day will give you consistent results. You may also try taking it out of the fridge 3 times a week to feed, even if you are not baking, once a week, or once a month. Bare in mind, it will respond accordingly to the amount of feedings you give it. Here is standard rule of thumb for once it’s established, feed once or twice per day as follows: 20g starter (1tbsp) 40 grams water (3tbsp 40 grams flour (5tbsp plus 1 tsp) Build to larger quantities as needed for various sourdough recipes. If you do not want to make your own starter, you can acquire one through another baker, or order one from me here. |
AuthorRachel conducts gardening, culinary and fermenting workshops/retreats at her home on 100 acres in Northern Ontario, Canada, where she lives in creative harmony with nature. Rachel’s mission is to ensure the wisdom of our ancestors is preserved for future generations. Archives
July 2020
Categories
All
Images ©2002-2023 Rachel Thoo |
 RSS Feed